The Autumn update for the operating system Windows 10, November 2019 Update version 1909, is now available for installation. It introduces several changes compared to version 1903. This is the eighth major update for Windows 10 since its release in summer 2015 and the second one in 2019.
Although the update isn’t huge and comes as a cumulative update for devices running Windows 10 1903, certain problems can arise during and after the installation. Especially on computers running older versions of Windows 10, where a full reinstall of the system is required, which may result in errors and malfunctions.
Typically, the arising problems aren’t caused by Windows 10 itself. Outdated drivers, incompatible programs, and unusual hardware configurations may be to blame.
In this guide, we will have a look at the most common errors and the options for fixing them.
Contents
- 1 Guide To Fixing Errors In Windows 10 November 2019 Update
- 2 How to solve problems when using Windows Update
- 3 How to fix Error 0x80073712 when using Windows Update
- 4 How to fix Error 0x800F0922 when downloading the latest version of Windows 10 through Windows Update
- 5 How to fix errors during Windows 10 November 2019 Update installation through Media Creation Tool
- 6 How to fix problems when installing November 2019 Update from a flash drive
- 7 How to fix Windows installation errors 0x8007042B and 0x800700B7
- 8 How to fix download freezes when using Update Assistant
- 9 How to fix storage error 0x80070070
- 10 How to fix Error 0xC1900107
- 11 How to fix problems during completion of the November 2019 Update installation
- 12 How to fix Error 0x80070002 0x20009
- 13 How to fix 0xC1900101 driver error
- 14 How to fix 0x800F0923 driver incompatibility error
- 15 Driver incompatibility fix
- 16 Fix for application compatibility problems
- 17 How to fix application incompatibility error 0xC1900208
- 18 Black screen fix
- 19 Uninstalling the November 2019 Update on a computer with Windows 10 October 2018 Update
- 20 Uninstalling the November 2019 Update on computers with Windows 10 May 2019 Update
- 21 How to fix network problems in November 2019 Update
- 22 How to fix activation problems in November 2019 Update
- 23 How to fix Error 0x80200056 after an accidental reboot
- 24 How to prepare for updating to Windows 10 November 2019 Update
- 25 Clean installation
- 26 Conclusion
Guide To Fixing Errors In Windows 10 November 2019 Update
Important note: Two kinds of problems may arise when updating to the new version of Windows 10. You can encounter common errors during or after installation, such as problems with Windows Update, storage, activation, etc. You may also face errors that have no relation to the version of the November 2019 Update.
Other bugs are indeed related to version 1909 specifically. As a rule, these are installation problems that may be caused by outdated drivers, incompatibility with certain applications, a third-party antivirus, etc.
In this guide, we will suggest different ways of solving both types of problems when installing the update over version 1903 or an earlier one. The updating may be done through Windows Update, Media Creation Tool, and Update Assistant.
How to solve problems when using Windows Update
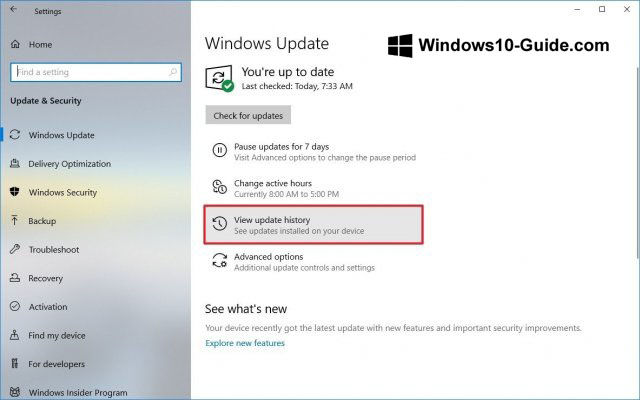
The easiest way to install version 1909 is to use Windows Update. In this case, certain errors may occur, making it impossible to install the update.
The causes of these errors are usually difficult to determine. But you can resort to the troubleshooting tool to quickly fix the most common errors. For this, you need to do the following:
- Open the Settings app.
- Go to the Update and Security section.
- Go to the Troubleshoot section.
- In the “Get up and running” section, select the “Windows Update” command.
- Click on the “Run the troubleshooter” button.
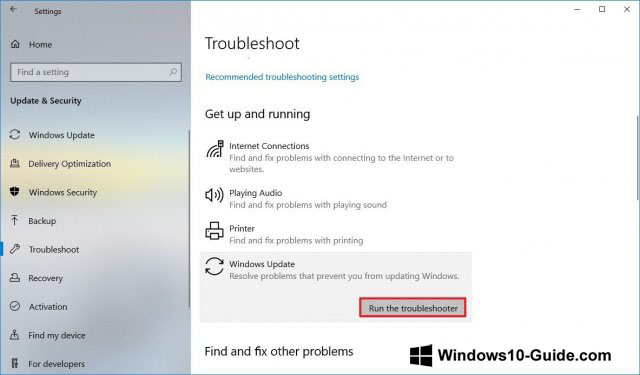
- Click on the “Apply this fix” button, if you see it.

Note: If you do not see this button, it doesn’t mean the troubleshooter does not work. It may be scripted to fix common errors automatically. If there are problems that don’t fall in this category, you’ll see the “Apply the fix” option.
- Continue to follow the instructions on your screen.
- Restart your computer.
After completing these steps, try downloading and installing the update again.
If you see Error 0xc1900223, it means problems with downloading the updates. Update Center will later try to download it again.
How to fix Error 0x80073712 when using Windows Update
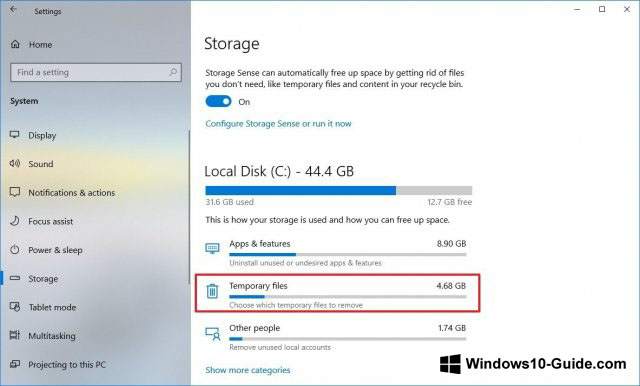
If you see Error 0x80073712 when trying to install the November update, this means the necessary files are missing or damaged. To fix this problem, you need to delete the temporary update files.
- Open the Settings app.
- Go to the System section.
- Click on the “Storage” subsection.
- Select the “Temporary files” option. If you have version 1809, click “Free up space now”.
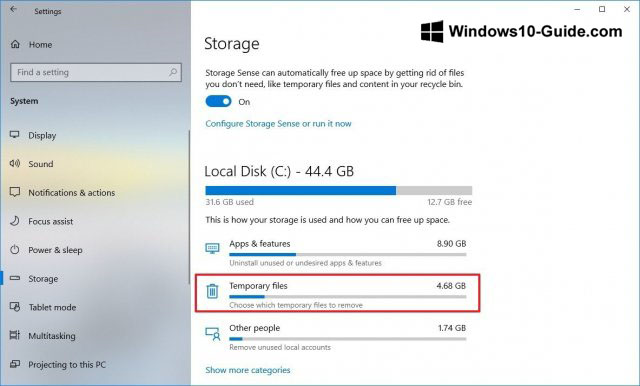
- Deselect the default boxes.
- Select the “Temporary Windows Installation Files” section.
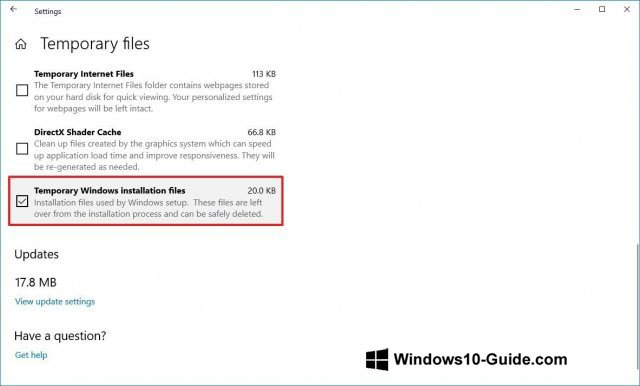
- Click on the “Delete files” button.
After completing these steps, try to install the version 1909 update.
If you keep getting the same error or errors 0x80245006 and 0x80190001, use Media Creation Tool and perform a clean install of the latest version of Windows 10.
How to fix Error 0x800F0922 when downloading the latest version of Windows 10 through Windows Update
Error 0x800F0922 may pop up in Windows Update. It means that the computer cannot connect to the update servers or the System Reserved partition does not have enough free space.
Disabling VPN
If you see Error 0x800F0922 when you try to update to version 1909, there is a possibility that you are using a VPN. To start the update process, disable it:
- Click on the “Network” icon in the system tray.
- Select the VPN connection.
- Click on the “Disable” button.
This will disable the default client used in Windows 10. If you use third-party applications, disabling the VPN may be done differently.
Resizing the System Reserved partition
Sometimes third-party applications, such as antiviruses, save their data in the System Reserved partition. This may interfere with updating Windows 10.
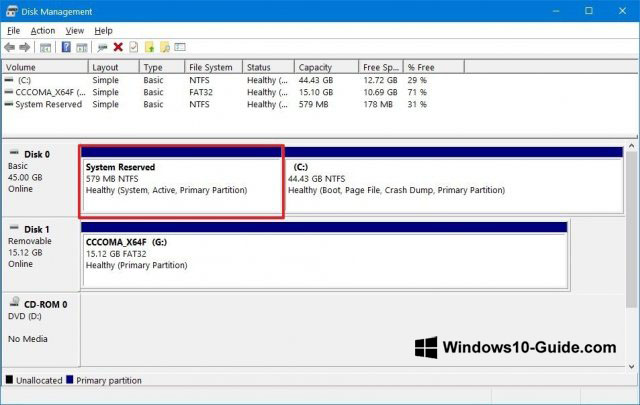
In this case, third-party software may be required to resize the partition. It must be at least 500 MB. An alternative is a clean installation of Windows 10 1909. This option will solve the problem and can also improve your system’s performance.
How to fix errors during Windows 10 November 2019 Update installation through Media Creation Tool
Media Creation Tool is a convenient tool for performing a clean installation of Windows 10. Sometimes errors occur during this process.
Fix freezing problems when downloading the update
Before installing the latest version of Windows 10, Media Creation Tool downloads installation files and any available cumulative updates. Sometimes the download freezes and the update is not installed.
If the message “Receiving updates” has been on your screen for too long, you can do the following:
- Close Media Creation Tool.
- Restart the application.
- When the installation files are downloaded, disconnect the network cable from the computer or disconnect the wireless network.
- When these steps are complete, Media Creation Tool will continue the update process.
If Media Creation Tool doesn’t start the installation
If the application has frozen while downloading the installation files, you may need to activate the update process manually:
- Open the file explorer.
- Go to the following path: C:\$Windows.~BT\Sources
- Double-click the Setup.exe file to launch the installation.
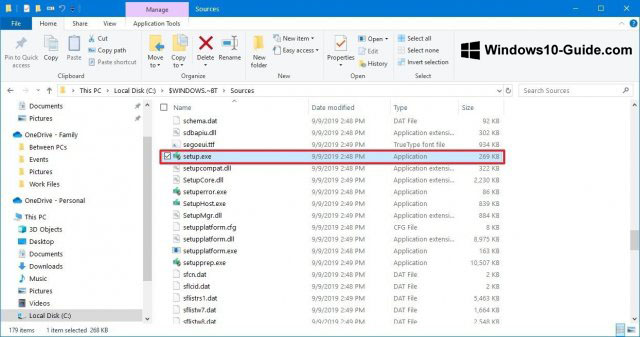
After completing these steps, your device should continue the update process. If the problems persist, you can try to update your system using Update Assistant.
How to fix problems when installing November 2019 Update from a flash drive
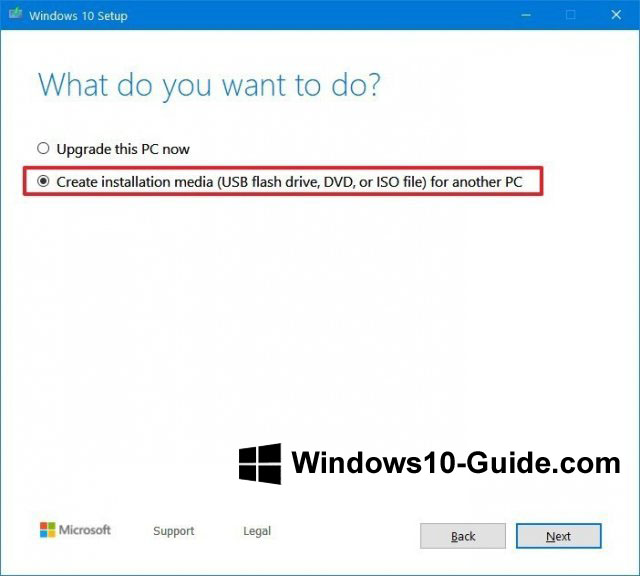
If the update installation via a USB flash drive fails, it means the installation files may be missing or damaged. To solve this problem, you can use Media Creation Tool to recreate the bootable flash drive. For this, do the following:
- Go to the Microsoft support site.
- Go the section “Create installation media for Windows” click on the button “Download tool now.”
- Save the installation file to your computer.
- Double-click on MediaCreationTool1909.exe to start the installation.
- Click on the “Accept” button.
- Select “Create installation media (USB flash drive, DVD, or ISO file) for another PC”.
- Click on the “Next” button.
- Select your language, architecture, and edition if they differ from the defaults.
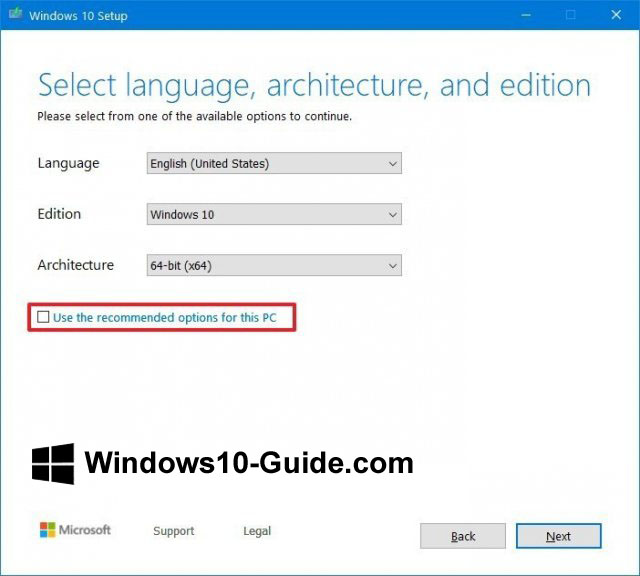
- Click on the “Next” button.
-
Select the option “USB flash drive”.
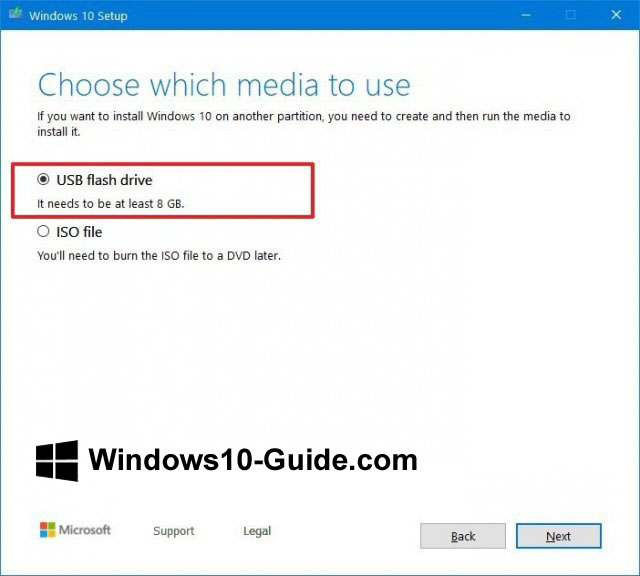
- Click on the “Next” button.
- Select the removable drive from the list.

- Click on the “Next” button.
- Click on the “Finish” button.
After performing these steps, the tool will create installation media with updated files. If the attempt to update Windows 10 failed, try performing these steps again using a different computer.
How to fix Windows installation errors 0x8007042B and 0x800700B7
During the installation of Windows 10 1909 updates using Update Assistant and Media Creation Tool, errors 0x8007042B 0x4000D and 0x800700B7 0x2000A can occur. They block the installation of the update.
These errors typically appear when another process is running in the background, such as a third-party antivirus or some other program.
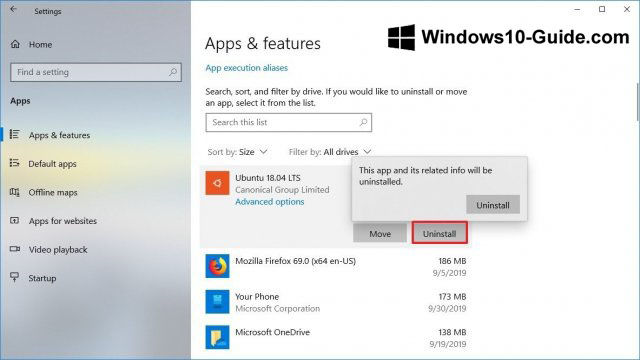
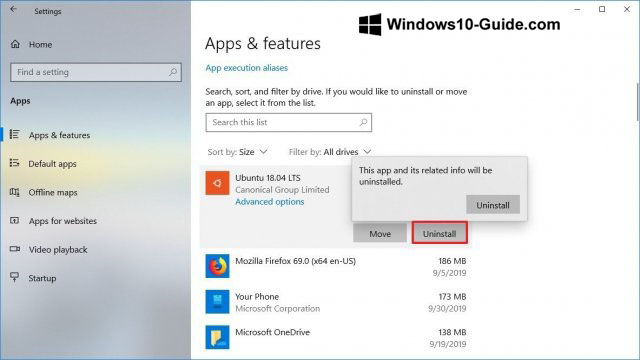
Before trying to update Windows, you need to find and close these processes or programs. Or you could perform a clean installation of Windows 10. There is also the option to temporarily delete the application data. To uninstall applications, do the following:
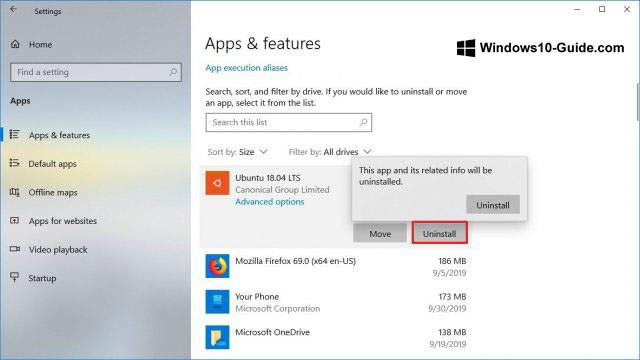
- Open the Settings app.
- Go to the Apps section.
- Proceed to the subsection “Apps and features”.
-
Select an application and click on the “Uninstall” button.
- Follow the instructions you see on your screen.
After completing these steps, the Windows 10 updates should install without a hitch. If you’ve uninstalled the antivirus, don’t forget to install it again after updating the system.
How to fix download freezes when using Update Assistant
Another Microsoft tool for updating the system is Update Assistant. It may come in handy if Windows Update cannot handle the task. However, problems may occur in this tool, too.
The arising problems are usually related to the network. In this case, do the following:
- Disconnect the network cable or turn off the wireless connection. Wait for about a minute and reconnect to the network. Then restart Update Assistant.
- Restart your computer, and then restart Update Assistant.
If the problems persist, use Media Creation Tool to update your system.
How to fix storage error 0x80070070
Windows 10 requires 20 GB of disk space for reinstallation and 32 GB for a clean installation. If you have less free space, errors 0x80070070 – 0x50011, 0x80070070 – 0x50012 and 0x80070070 – 0x60000 may appear.
To fix them, you need to free up the required disk space by deleting unnecessary files:
- Open the Settings app.
- Go to the System section.
- Click on the “Storage” subsection.
- Select the “Temporary files” option. If you have version 1809, click “Free up space now.”
- See what can be deleted here. Do not delete the temporary Windows installation files.
- Click on the “Remove files” button.
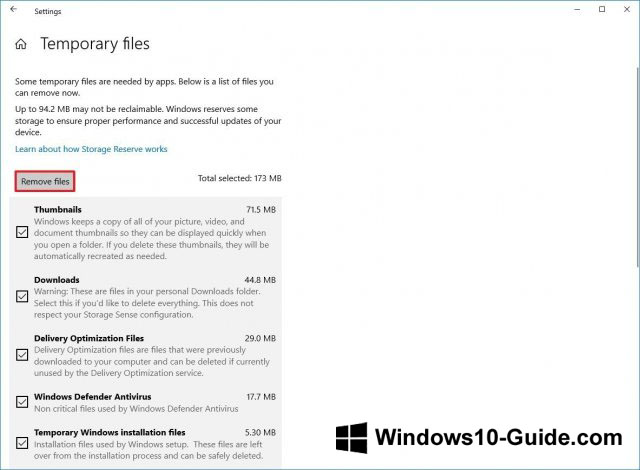
After completing these steps, continue installing the version 1909 update. If you continue despite a lack of disk space, you will need to connect an external hard drive or USB flash drive with a capacity of at least 16 GB for temporary storage of the installation files.
How to fix Error 0xC1900107
You may sometimes encounter Error 0xC1900107. It means that you recently updated your system to a new version, and it is necessary to delete the files of the previous installation.
In this case, you can try restarting your computer. If the error persists, use the “Storage Sense” option to manually remove previous versions:
- Open the Settings app.
- Go to the System section.
- Click on the “Storage” subsection.
- Click on the command “Configure Storage Sense or run it now”. In older versions, this command may be called “Change how we free up space automatically”.
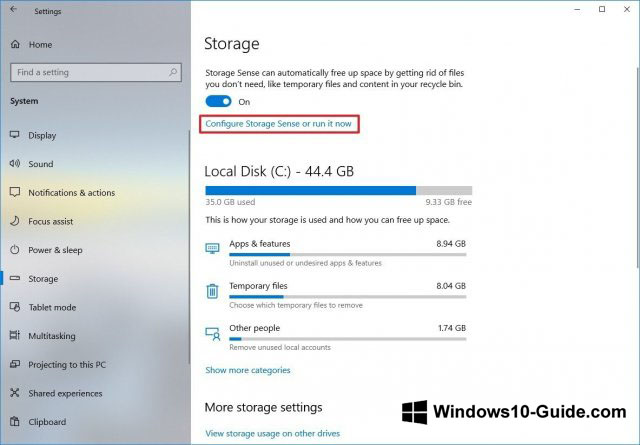
- In the “Free up space now” section, check the “Delete previous versions of Windows” option.
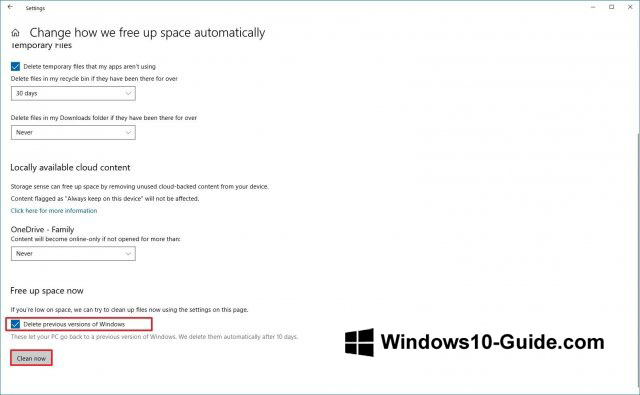
- Click on the “Clean now” button.
After completing these steps, the Windows.old folder with the old files will be deleted and Error 0xC1900107 will no longer appear.
How to fix problems during completion of the November 2019 Update installation
The following errors may occur at the end of the installation of updates:
Error: Unable to complete the update. Canceling changes. Do not turn off the computer.
Error: Windows update setup failed. Canceling changes. Do not turn off the computer.
These errors make it impossible to complete the update installation.
Before looking for a solution online, you need to find out which error has occurred. To find the error code, do the following:
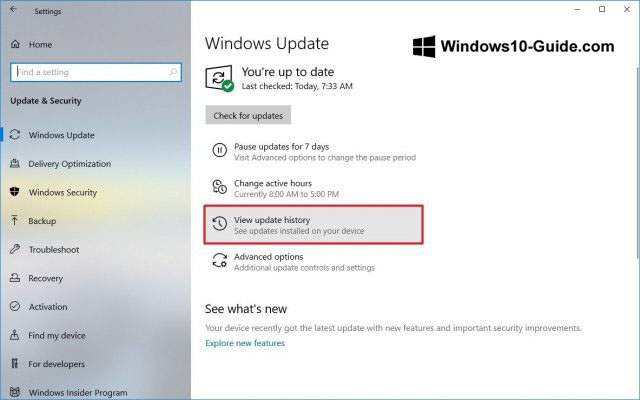
- Open the Settings app.
- Go to the Update and Security section.
- The Windows Update page opens up.
- Click on the “View update history” link.
- Look at the error code indicated next to the update that failed to install.
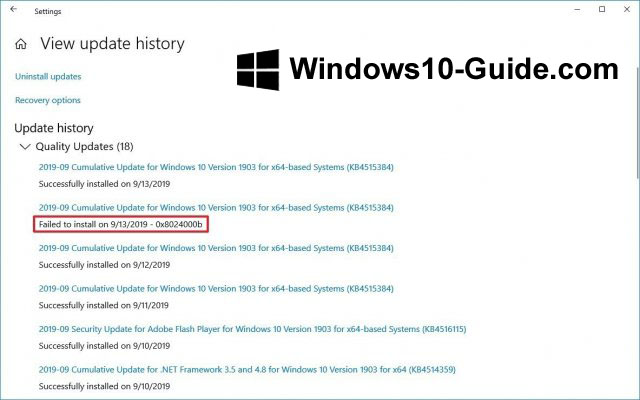
Use this code to search for a solution online. You can also use the Windows 10 update history page. It contains information on updates and problems that occurred during their installation.
How to fix Error 0x80070002 0x20009
This error means Windows 10 cannot find specific files. If it occurs, disconnect all external media, such as flash drives and hard drives, except for those that contain installation files. After the update, you can reconnect them.
How to fix 0xC1900101 driver error
Errors 0xC1900101 and 0x80090011 may indicate a problem with the drivers. There are several possible variants of this error:
0xC1900101 – 0x2000c
0xC1900101 – 0x20017
0xC1900101 – 0x30017
0xC1900101 – 0x30018
0xC1900101 – 0x3000D
0xC1900101 – 0x4000D
0xC1900101 – 0x40017
To fix them, you will need to perform the following steps:
Disk space optimization
Windows 10 now uses Reserved Storage to solve disk space problems, but it’s available only in the latest versions. If Error 0xC1900101 occurs, you may need to resort to the memory settings, delete any unnecessary applications and games, transfer files elsewhere to free up space.
Disconnecting devices
To reduce the likelihood of errors during the update, it is recommended to disconnect all unimportant devices. These may include external hard drives and flash drives, Bluetooth devices, USB, cameras, and others.
Once the update is completed, you can reconnect them.
Updating device drivers
If you see errors 0xC1900101 and 0x80090011, you need to pay attention to the drivers.
To check the drivers, do the following:
Important note: if you downloaded drivers from the device manufacturer’s website, follow the instructions provided there and skip the steps below.
- Open the Start menu.
- Type “device manager” in the search box.
- Select the device. Problematic ones are marked with a yellow exclamation mark.
- Right-click on the device, select the “Update driver” option.
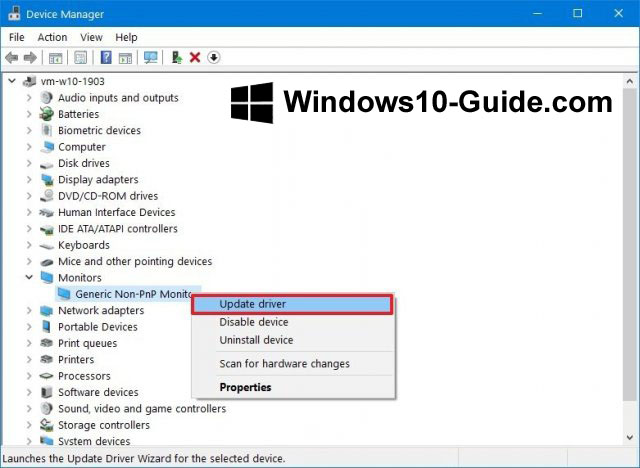
- Choose between the automatic driver search or specify the path to it manually.
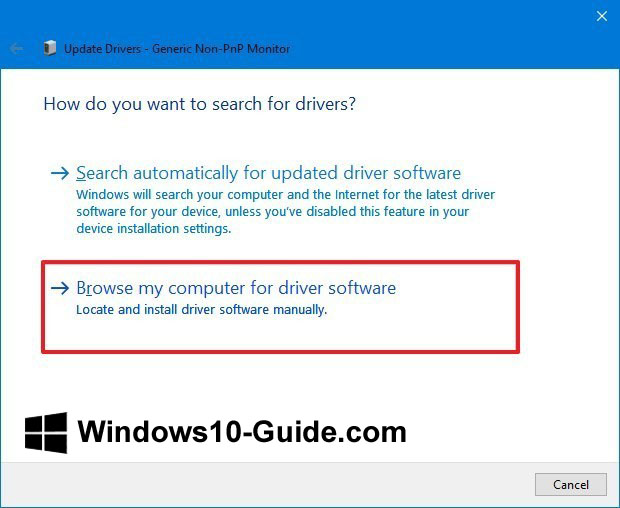
- In the latter case, click on the “Browse” button.
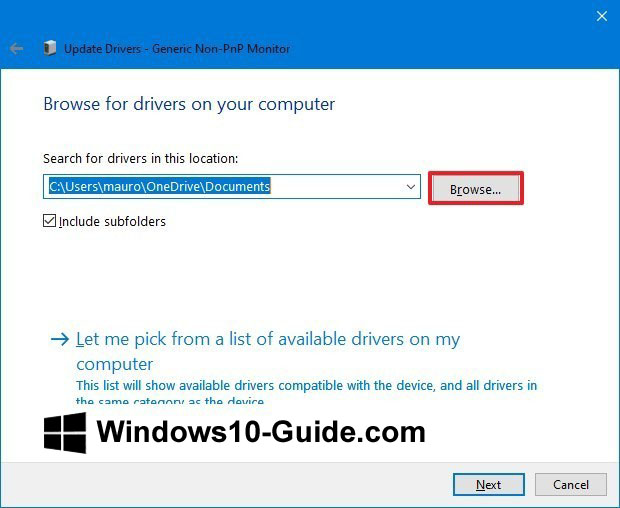
- The driver needs to be unpacked.
- Click on the “Next” button.
- Follow the instructions on your screen.
After you do all of this, the errors 0xC1900101 and 0x80090011 should no longer appear.
Fixing the current build
If you receive a message about Error 0xC1900101, this may indicate problems with the installed version of Windows 10 and the system’s inability to update. In this case, you can resort to the utilities Deployment Servicing and Management (DISM) and System File Checker (SFC) (in this order) to fix the current build.
Fixing the hard drive
You can also use the CHKDSK command-line tool to check and recover hard disk partitions and fix some physical errors. These issues may cause problems during the update of Windows 10 to version 1909.
Close all applications and do the following:
- Open the Start menu.
- Type cmd in the search box and choose to run it as administrator.
- Enter this command: chkdsk/f c:
- Enter Y and press Enter to initiate a check of the hard disk.
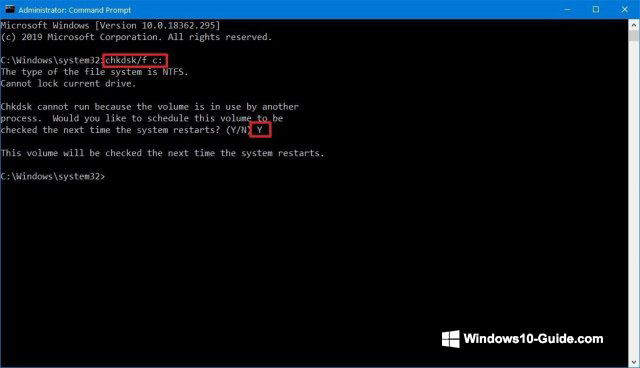
- Restart the computer.
During the boot-up, the system will start checking the hard drive and fixing its errors.
Clean installation
If all the suggested options fail to fix the errors, you can use Media Creation Tool to perform a clean installation of Windows 10 1909.
How to fix errors 0xC1900200, 0xC1900202, 0x80300024 during update installation
These errors mean your computer does not meet the minimum system requirements. Depending on the update method, these requirements may vary slightly. The minimum requirements for installing Windows 10 are as follows:
| Processor | 1 GHz or faster |
| RAM | 1 GB for 32-bit systems, 2 GB for 64-bit systems |
| Storage | 16 GB for 32-bit systems, 20 GB for 64-bit systems, 32 GB for a clean installation |
| Graphics | DirectX 9 or later with the WDDM 1.0 driver |
| Screen | 800 x 600 pixels |
The errors 0xC1900200 – 0x20008 and 0xC1900202 – 0x20008 typically occur on old and cheap devices and are most often caused by a lack of memory.
How to fix 0x800F0923 driver incompatibility error
Error 0x800F0923 indicates an incompatibility of drivers or applications installed in the system. More often than not, it is the GPU driver that causes this error. It may also be caused by an old program, antivirus, the driver of another device.
Update Assistant and Media Creation Tool can give you more details about the problem.
If the driver is to blame for the error, you need to download its latest version from the manufacturer’s website. You can try installing the latest beta version of the driver.
If you have the latest drivers installed, you can try removing them before continuing the update process. Once the update is complete, you can reinstall the drivers.
Driver incompatibility fix
To remove the driver of a device:
- Open the Start menu.
- Type “device manager” in the search box.
- Find the problematic device on the list.
- Right-click on it and select “Uninstall device”.
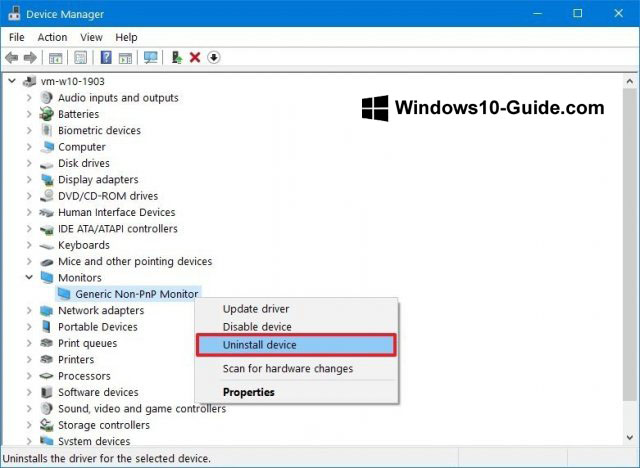
- Click “Uninstall” again.
Now try to install the update.
Other similar errors include 0x80070490 – 0x20007. Error 0x80070003 – 0x20007 means the update failed during the driver installation stage.
If you get one of these errors, then, after rolling back to the previous version, use the above instructions to remove the problematic driver.
Fix for application compatibility problems
If incompatible applications are installed on your system, upgrade them to the latest version or remove them before updating to Windows 10.
How to uninstall an application:
- Open the Settings app.
- Go to the Apps section.
- The “Apps and features” page will open.
- Select the application and click on the “Uninstall” button.
- Click “Uninstall” again.
- Follow the instructions on your screen.
After completing these steps, try again to install Windows 10 1909. When the update installation is finished, you can reinstall the applications.
How to fix application incompatibility error 0xC1900208
If you get Error 0xC1900208 – 0x4000C, the incompatible application is again to blame. Uninstall it as described above. If you don’t know which application is causing problems, your first consideration should be third-party antiviruses and old versions of applications.
Black screen fix
When upgrading to Windows 10 1909, you may encounter the black screen problem. This points to a GPU driver issues, hardware errors, or incorrect installation of an update in the past.
Try the troubleshooting tool. If the problem persists, the 1909 update may not be compatible with your hardware or software configurations. In this case, it is not recommended to install it.
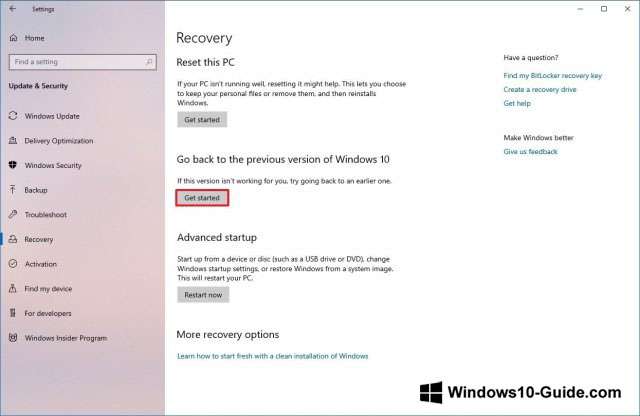
Uninstalling the November 2019 Update on a computer with Windows 10 October 2018 Update
If you recently updated a device running Windows 10 October 2018 Update or an earlier version, you need do the following to uninstall the November 2019 Update:
- Open the Settings app.
- Go to the Update and Security section.
- Go to the “Recovery” subsection.
- In the “Go back to the previous version of Windows 10” section, click on the “Get started” button.
- Indicate the reasons for going back to the previous version.
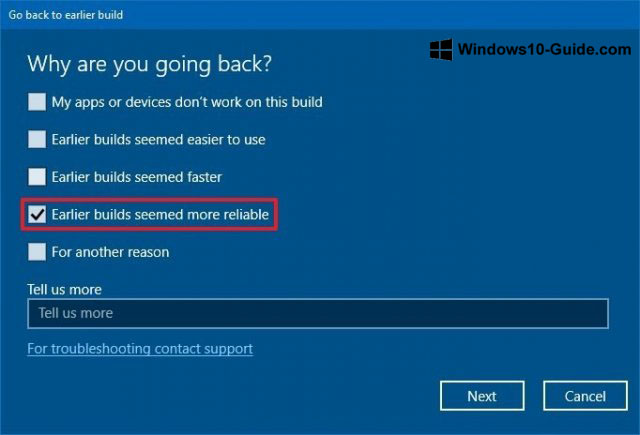
- Click on the “Next” button.
- Click on the “No, thanks” button.
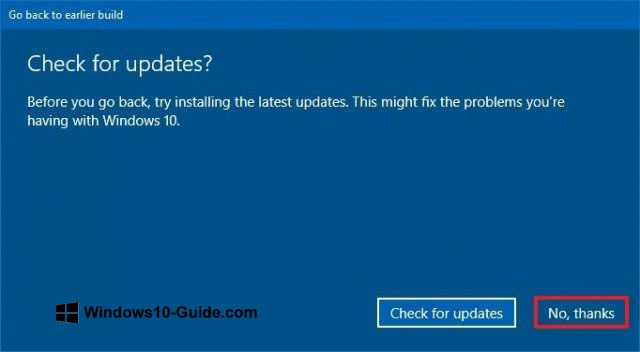
- Click on the “Next” button.
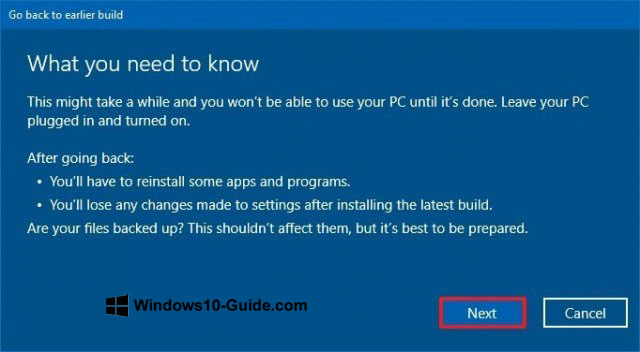
- Click on the “Next” button.
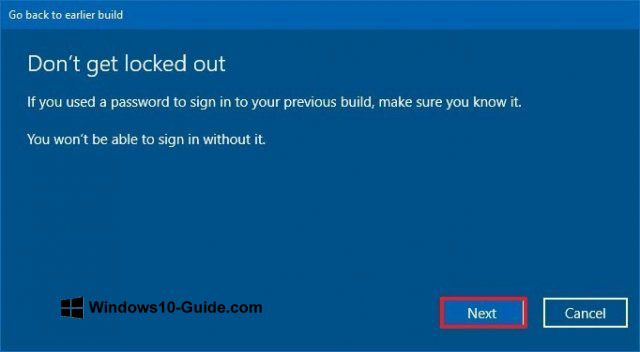
- Click on the “Go back to earlier build” button.
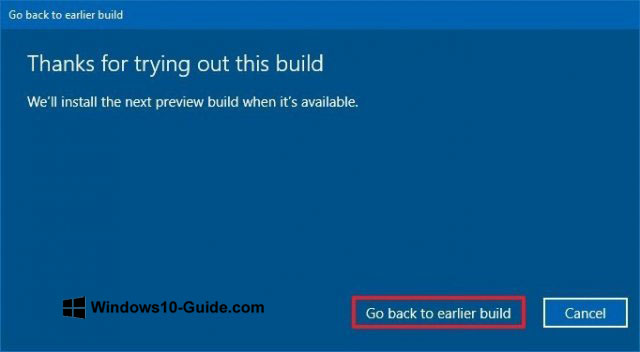
After performing these steps, it’s better not to upgrade your computer to this version until the problems on your device are resolved.
Uninstalling the November 2019 Update on computers with Windows 10 May 2019 Update
If you have installed version 1909 on a computer running Windows 10 May 2019 Update, follow these steps to uninstall it:
- Open the Settings app.
- Go to the Update and Security section.
- The “Windows Update” subsection opens up on your screen.
- Click on “View update history”.
- Click on “Uninstall updates”.
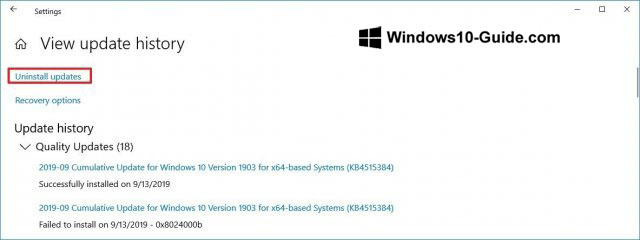
- Select KB4517245 at the top of the list.
- Click on the “Uninstall” button.
- Click on the “Yes” button.
- Click on the “Restart now” button.
If you are running a Windows 10 version that is approaching the end-of-servicing date, Windows Update may try to install this update again. If you do not wish to update your system, you can block these auto-update attempts.
You can see the known update issues on the Windows 10 status bar on this page.
How to fix network problems in November 2019 Update
After the installation is complete, you may sometimes face problems while connecting to the Internet, whether it’s wireless or wired. The connection may be unstable or completely absent. This issue can have several causes. For example, it can be caused by a problem in the adapter, driver, settings, signal, cable, router, provider, or software error in the operating system.
Finding and fixing Wi-Fi or wired connection problems can be time-consuming. But if the connection errors appeared immediately after installing version 1909, drivers or settings are most likely to blame. You can fix these issues using the network troubleshooter.
How to use the network troubleshooting tools:
- Open the Settings app.
- Go to the Network and Internet section.
- The “Status” subsection opens up on your screen.
- In the “Change your network settings” section, click on the “Network troubleshooter” button.
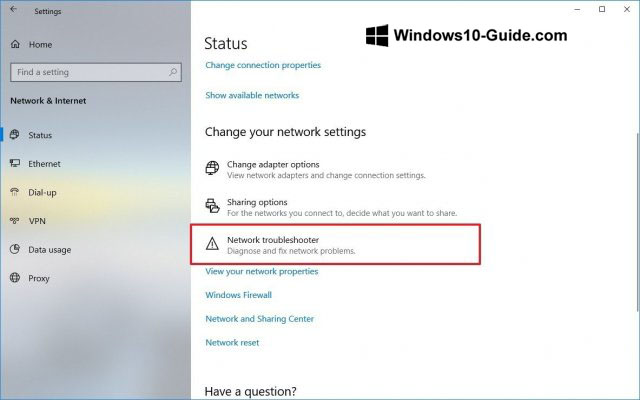
- Follow the instructions on your screen.
Network reset
If the device still cannot connect to the network, you may need to reset all settings to the default options.
- Open the Settings app.
- Go to the Network and Internet section.
- The “Status” subsection opens up on your screen.
- In the “Change your network settings” section, click on the “Network reset” link.
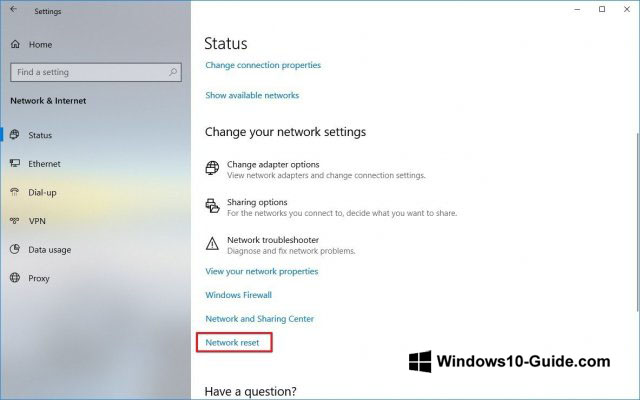
- Click on the “Reset now” button.
- Click on the “Yes” button.
A network reset will delete and reinstall all network adapters connected to the device. They will be configured to the default settings.
If this does not fix the problem, there may be a software error in the November 2019 Update.
How to fix activation problems in November 2019 Update
When Windows 10 is activated, you do not need to enter a license key after installing or updating its components. However, sometimes the reactivation does not work as expected. The result is the message “Windows is not activated” appears and Error 0x803F7001 on the activation page.
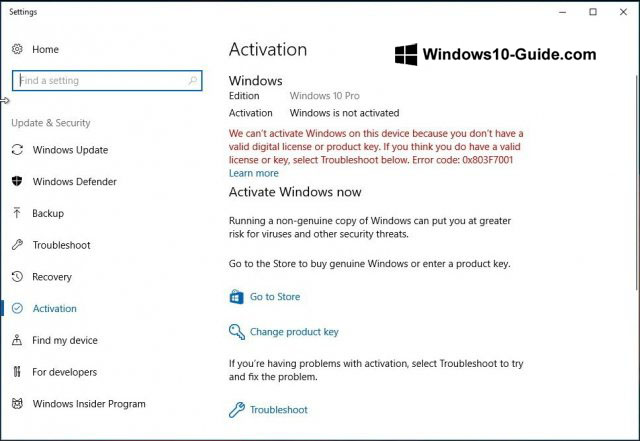
When this happens, you simply need to wait. You can also use the Activation troubleshooter to fix the error immediately.
How to fix Error 0x80200056 after an accidental reboot
If you accidentally restarted the computer when the updating was in progress, Error 0x80200056 may appear. This isn’t a serious problem and you just need to restart the update process.
How to prepare for updating to Windows 10 November 2019 Update
It is a no mean task to design a system for hundreds of thousands of component combinations – even though the updates are optional and Microsoft uses machine learning, artificial intelligence, telemetry, and feedback from users and manufacturers to control their distribution. Due to the complexity of the matter, unexpected problems may occur during and after the update.
By doing some preparations beforehand, you can reduce the likelihood of having to deal with various problems. Here’s what you need to do:
Create a backup
It’s never a good idea to introduce changes to the current build without having made a backup. Although the installation process has a security mechanism for rolling back to a previous version, it does not always work.

Before installing the update, you need to create a temporary backup using the tool available in Windows 10. This will allow you to quickly roll back the system to the previous version, should the need arise. It is also advisable to copy important files to external hard drives or cloud storage.
Configure a restore point
When using May 2019 Update, the probability of encountering errors when updating is insignificant, since version 1909 does not require a complete reinstall. However, problems may still occur.
It is advisable to create a system restore point before proceeding to install updates. This will allow you to restore your system to an operational state in case of problems.
By default, restore points may be disabled.
- Open the Start menu.
- Type “restore” in the search box. Click “System Properties”.
- On the “System Protection” tab, select the system partition – usually it is drive C. Click on the “Configure” button.
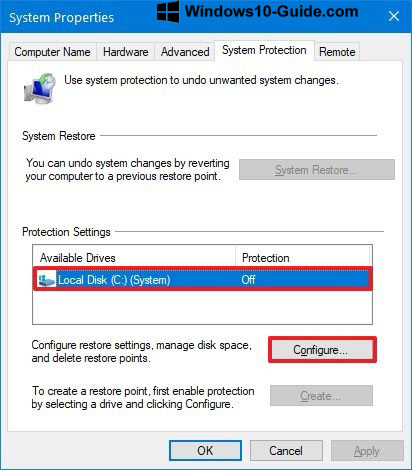
- Select “Turn on System Protection”.
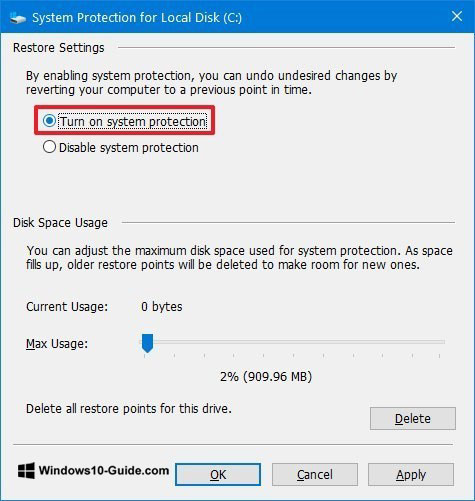
- Click “OK”.
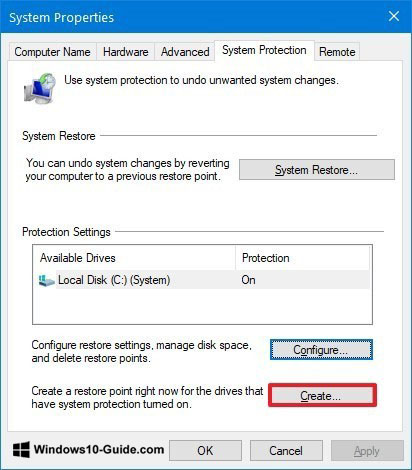
- Click “Create”.
- Name the restore point.
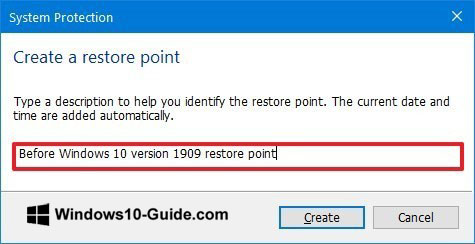
- Click on the “Create” button.
- Click on the “Close” button.
- Click on the OK button.
Now, if any errors occur during the update process, you can use this restore point to roll back to the previous state.
Uninstall unnecessary apps
Sometimes updates cannot install due to incompatibility with applications. It is outdated apps that usually cause problems. To reduce the likelihood of such issues, remove unnecessary applications. For example, a third-party antivirus and/or outdated desktop programs.
After uninstalling unnecessary apps, try updating Windows 10.
Uninstall or disable security apps
In addition to uninstalling obsolete applications, it’s a good idea to uninstall third-party antiviruses and other security applications. After updating, you can reinstall them.
If you only use the Windows Defender antivirus, you cannot uninstall it – however, it can be disabled.
Warning: temporarily disabling or uninstalling antiviruses does not carry a risk. However, it’s not advisable to work on the Internet for a long time without protection.
To disable Windows Defender’s real-time protection, do the following:
- Go to Settings > Updates and Security > Windows Security.
- Click on “Virus and threat protection”.
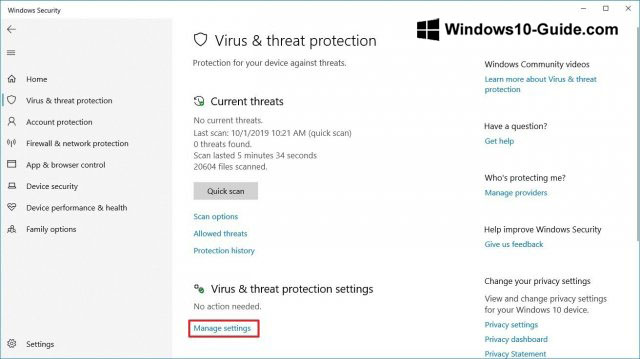
- Disable real-time protection.
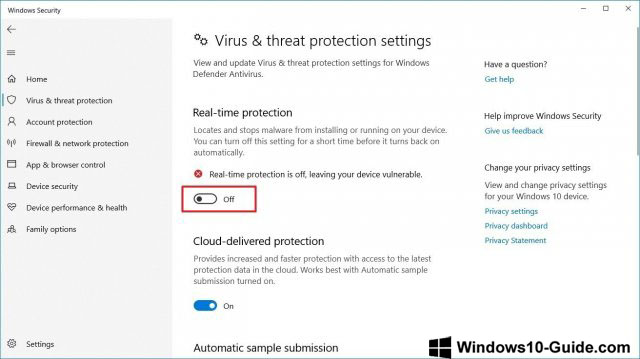
After installing the update, real-time protection will be enabled automatically.
Disable unnecessary peripherals
Optional peripherals – such as flash drives, external hard drives, SD cards, printers, scanners, Bluetooth devices – can cause errors during a system update. Before installing the update, it is advisable to disable them. Ideally, only the monitor, keyboard, mouse, and Internet connection should remain. Once the update is installed, you can reconnect the peripherals to your PC.
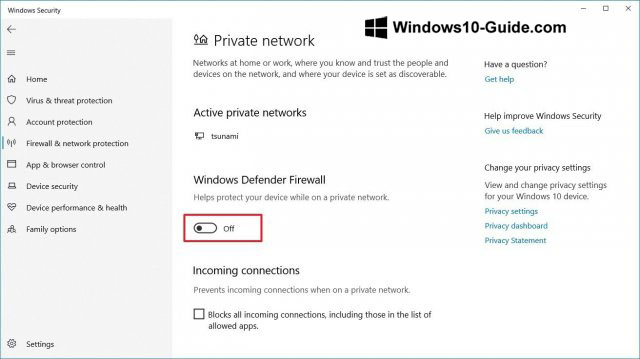
Disable Firewall
In rare cases, built-in or third-party firewalls may also cause problems when you try to update Windows 10 through Windows Update. Disable them.
If you use the Windows Defender firewall, do the following:
- Go to Settings > Updates and Security > Windows Security.
- Click on “Firewall & network protection”.
- Click on the network labeled as “Active”.
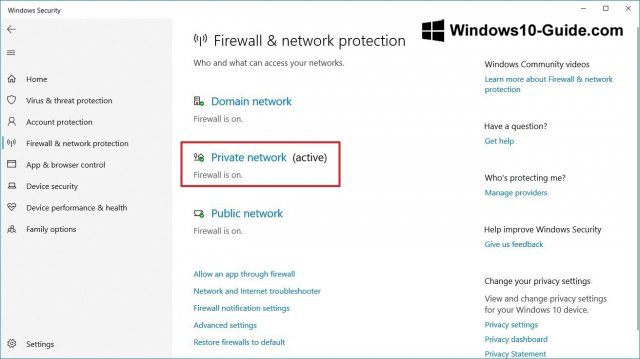
- Turn off Windows Defender Firewall.
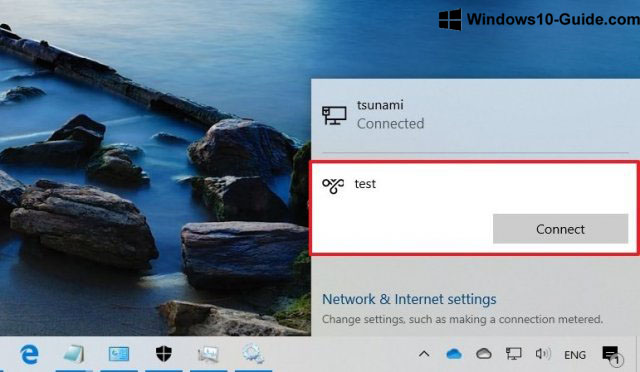
Disable metered connection
It’s not possible to download a Windows 10 update if your connection is marked as metered. Such connections are set up if you do not have an unlimited Internet plan. To disable metered connection in Windows 10, do the following:
- Open the Settings app.
- Go to the Network and Internet section.
- Select the Ethernet or Wi-Fi section, depending on your method of accessing the network.
- Select the active network.
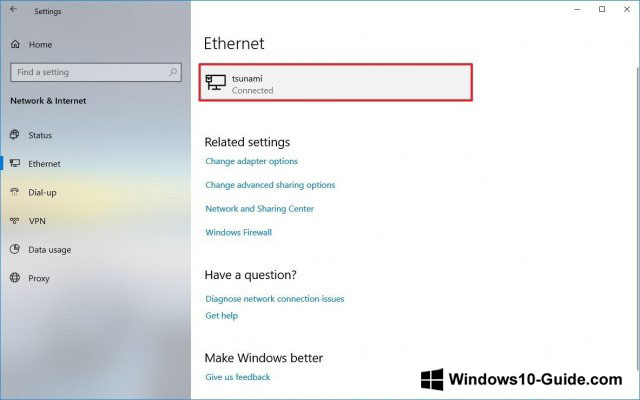
- In the “Metered connection” section, disable the switch “Set as metered connection”.
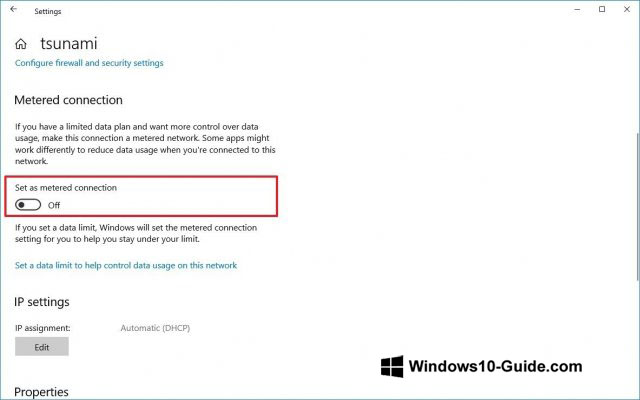
After disabling metered connection, you can download the Windows 10 update.
Clean installation
When everything else fails and you no longer want to try different fixes, you can perform a clean installation of Windows 10. This erases all the files in the hard drive partition and installs a fresh copy of Windows 10 with all the latest updates. This approach can solve many problems and increase your system’s productivity.
For a clean installation of Windows 10, you need to create bootable media using Media Creation Tool and boot the system from it.
Conclusion
Microsoft has been releasing major updates for Windows 10 every six months. But this time, the situation is a bit different. Instead of a major update with a plethora of changes, version 1909 changes little compared to May 2019 Update. As a result, the update process is simpler and faster, although much depends on the performance capabilities of your computer. When upgrading from version 1903, a full reinstall is not required. This lowers the risk of encountering errors.
If you have one of the older versions, such as October 2018 Update or April 2018 Update, updating your system will involve its full reinstall. Here, the likelihood of errors is higher due to possible hardware and software incompatibilities.
This guide is designed to help users of older Windows 10 versions to update using Windows Update, Media Creation Tool, Update Assistant. When updating from version 1903 to 1909, using Windows Update is recommended, as it is the faster and safer option.
It is not advisable to update immediately after the latest version is released, as it may contain unknown problems and bugs. It’s better to wait for feedback from other users and an update notification from Windows Update.