The Microsoft company has already started the gradual distribution of May 2020 Update for Windows 10. It contains many changes and new features designed to improve the performance of computers and laptops. This is the ninth major system update and the first one in 2020.
Microsoft completed the update development earlier than usual, which allowed them to devote more time to testing and finding solutions to the problems discovered. As a result, version 2004 contains impactful code changes. This means potential compatibility issues, problems with drivers, unexpected errors, etc.
Since May 2020 Update requires a reinstallation of the system, there may arise problems that aren’t related specifically to this version. Typically, the update process may fail due to storage problems, incompatible programs, damaged or outdated drivers, custom component configurations, and component performance issues. In this guide, we will talk about some of the known problems and their possible solutions.
Guide to troubleshooting when installing Windows 10 May 2020 Update
When a new version of Windows 10 comes out, two types of problems can emerge. You may encounter known errors that occur during and after the update installation. These are problems with activation, storage, and functionality. These problems are not necessarily related to or caused by the 2004 version.
However, you may also encounter problems that arise specifically due to bugs in this update. These may be related to drivers, incompatibility with an application, or third-party antiviruses.
This article describes both types of problems, including ones that may arise during and after the installation which you performed utilizing Windows Update, Update Assistant, and Media Creation Tool.
How to fix Windows Update issues when installing May 2020 Update
Windows Update is the recommended tool for installing updates. However, this mechanism isn’t perfect and sometimes errors occur, preventing the update from being installed.
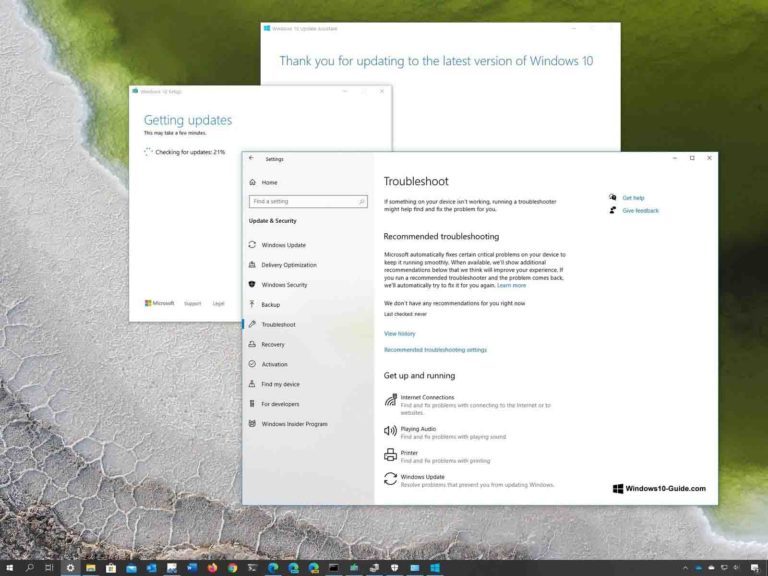
Guide to troubleshooting unexpected errors in Windows Update
If Windows Update does not work, you can use the troubleshooter to fix the most common errors.
Here’s a step-by-step manual to fix the download problems with the 2004 update using the troubleshooting tool:
- Launch the Settings application.
- Open Update and Security.
- Click Troubleshoot.
- In the “Troubleshoot – Get up and running” section, select “Windows Update”.
- Click on the “Run the troubleshooter” button.
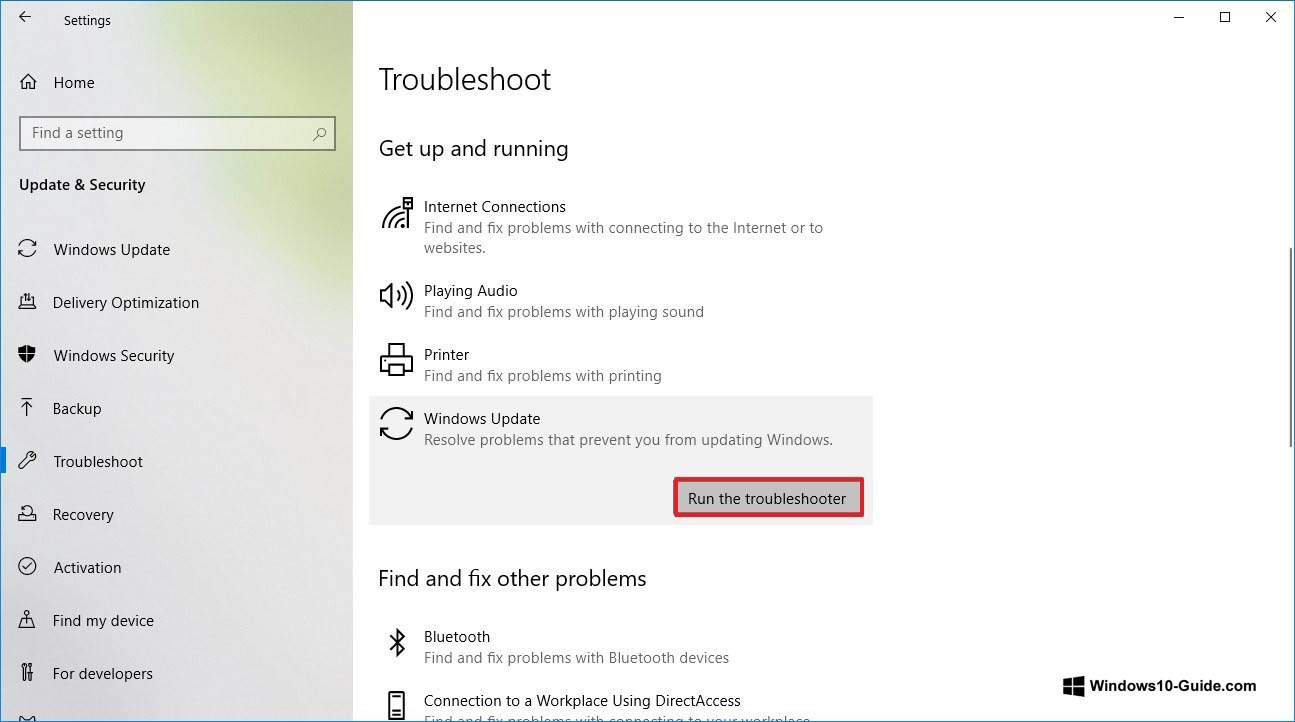
- Click “Apply this fix”, if such a button appears.
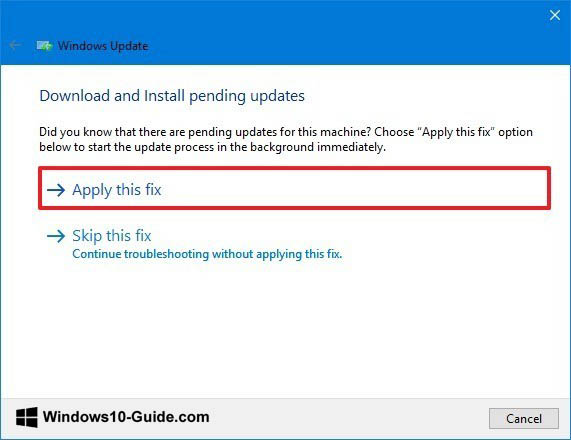
Note: if you don’t see the “Apply this fix” button, it is nothing abnormal. The tool will apply the fix automatically. If user approval is required, you will see the corresponding option.
- Continue following the instructions that pop up on your screen.
- Reboot your computer.
After you have done all this, Windows Update should download and install the May 2020 Update.
If you get error 0xc1900223, there are problems with downloading the update, and you cannot do anything about it. Later, the update center will try to download it again.
Quick guide to fixing Error 0x80073712 when using Windows Update
If you encounter error 0x80073712 while updating to Windows 10 2004, one or more of the necessary files are missing or damaged.
Solving this problem is possible employing the DISM command-line tool (which stands for Deployment Servicing and Management). It allows you to restore system files.
- Click on the “Start” button.
- Type cmd, then right-click and select Run as Administrator.
- Type the following command and press enter:
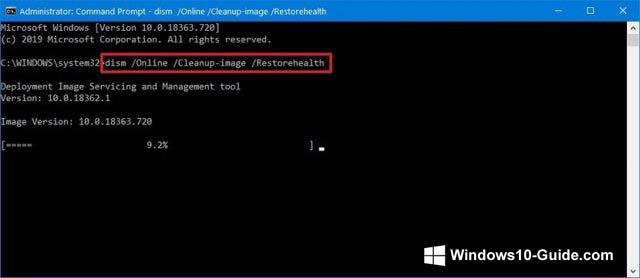
dism /Online /Cleanup-image /Restorehealth
After this, the necessary files will be restored and Windows Update will be able to download and install the update.
Fixing Error 0x800F0922 when using Update Center
Error 0x800F0922 pops up when Windows Update isn’t able to connect to a Microsoft server or when the System Reserved section is lacking the necessary amount of free space.
Turning off the VPN
Error 0x800F0922 may indicate that you have a VPN connection enabled.
Disabling the VPN will solve this problem. Here’s a manual on how to turn it off:
- Click on the network icon in the taskbar.
- Select the VPN connection.
- Turn it off by clicking on the corresponding button.
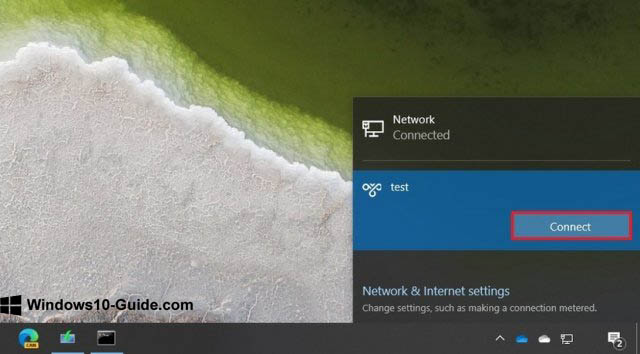
This fix will work if you utilize the VPN settings in Windows 10. If you make use of a separate, third-party application, check its documentation to find out how to turn off the VPN connection.
Changing the size of the System Reserved partition
If third-party security applications – for example, antiviruses – store their data in the System Reserved section, there is a likelihood that the Windows 10 update will not be able to install on your computer.
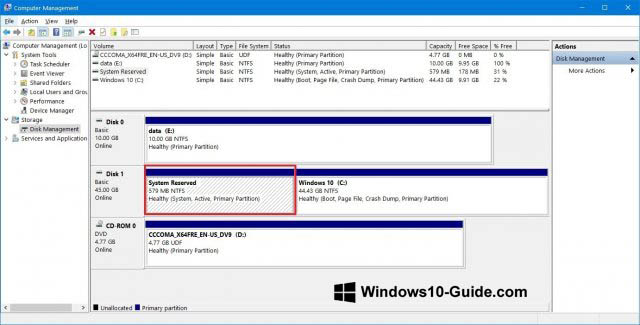
When this happens, the solution is to resort to third-party applications to adjust the size of the partition reserved for the needs of the system. This partition must not be less than 500 MB. Alternatively, you can perform a clean install of Windows 10 2004. This approach solves not only the partition size problem but also all other issues, which ultimately increases the productivity of your device.
Guide to fixing issues with Media Creation Tool when installing May 2020 Update
Media Creation Tool is a utility designed primarily for performing clean installations and updates of Windows 10. But if you choose to use this tool, you may also encounter problems at the beginning of the May 2020 Update distribution.
Fixing the freezing of the update download in Media Creation Tool
When performing an update, Media Creation Tool downloads the installation files of Windows 10, as well as additional updates. The downloading of additional updates may freeze, which will prevent the utility from installing version 2004.
If the download has been frozen for a long while, you can try the following solution:
- Close the window by pressing the corresponding button.
- Launch the Media Creation Tool again.
- Follow the instructions that show up on your screen.
- When the download of the installation files is completed, plug out the network cable or disconnect your computer from the Wi-Fi network.
Once you complete these steps and the update download timeout expires, the installation process will continue. Next, Windows Update will install all remaining updates.
Media Creation Tool does not start installing the update
If the files are downloaded but their installation does not start, you need to perform a manual launch of the process.
- Open File Explorer.
- Go to: C:\$Windows.~BT\Sources
- Double-click on the file named Setupprep.exe.
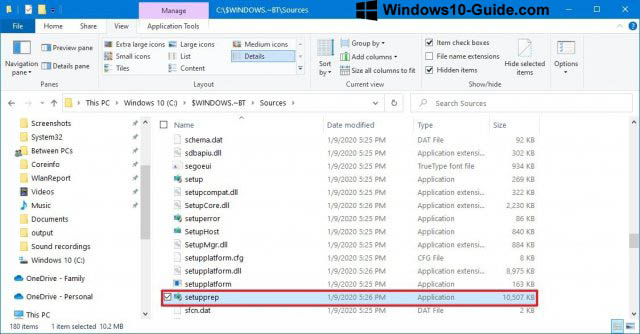
After doing these steps, you will be able to continue the installation process of May 2020 Update.
If problems remain, you can use Update Assistant to update your PC.
Brief manual for fixing problems when installing May 2020 Update from a USB drive
When the installation from a USB media fails, it may mean that the necessary files are corrupted or missing. The problem is easy to fix using Media Creation Tool.
Here’s a manual for creating bootable USB media:
- Go to the Microsoft support site: https://www.microsoft.com/en-us/software-download/windows10
- Click “Download tool now” after getting acquainted with the section “Use the tool to create installation media”.
- Save the installation file to your computer.
- Double-click on the file named MediaCreationTool2004.exe to start the installation process.
- Click on the “Accept” button.
- Select the option “Create installation media (USB flash drive, DVD, or ISO file) for another PC”.
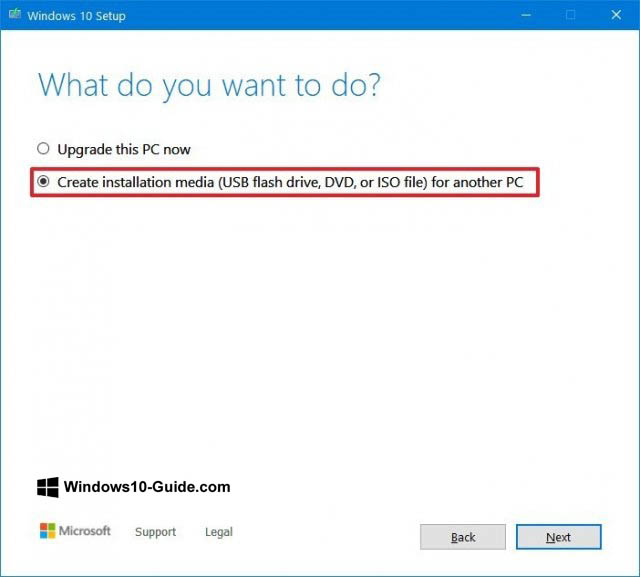
- Click “Next”.
- Select the language, processor architecture, and edition of Windows 10, if they differ from the default options.
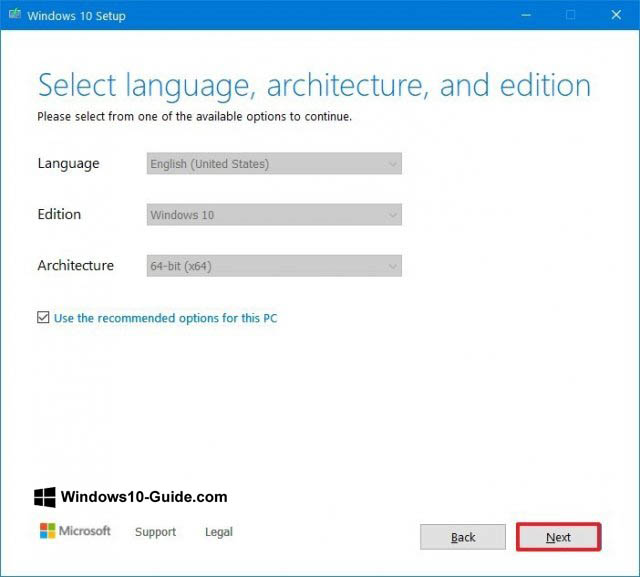
- Click “Next”.
- Select “USB flash drive”.
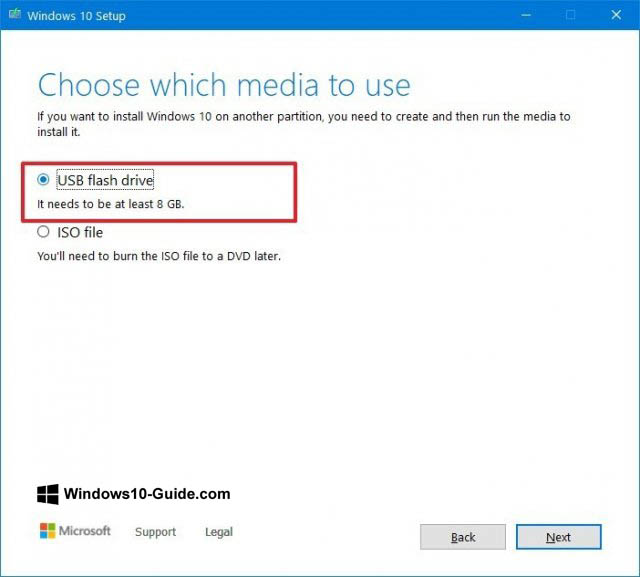
- Click “Next”.
- Select a removable disk from the list.
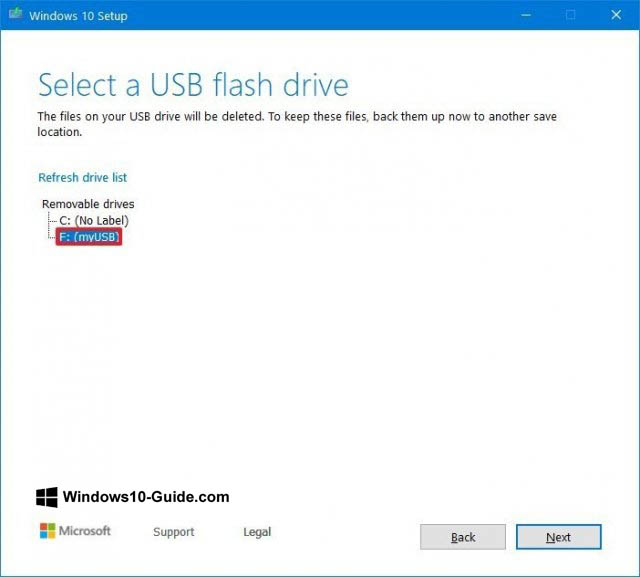
- Click “Next”.
- Click “Finish”.
As a result of these actions, you will have an installation media with updated files.
If your attempts to install from this media fails again, try recreating the above steps one more time, but on a different computer. Or use a different application – for example, Rufus – to create the installation media.
Guide to fixing installation problem with May 2020 Update
If the process of updating your system to Windows 10 May 2020 Update has begun, various errors may arise throughout its duration. They can be caused by different problems.
Troubleshooting errors 0x8007042B 0x4000D and 0x800700B7 0x2000A
These errors indicate that another process is currently running in the background. Typically, these are applications and services from the startup program group (such as system processes), third-party antivirus, and desktop applications.
You can use the task manager to shut down these processes and applications.
- Click on the “Start” button.
- Enter “task manager” into the search box and click on the top result.
- Click on the “Details” button.
- Select the application.
- Click on the “End task” button.
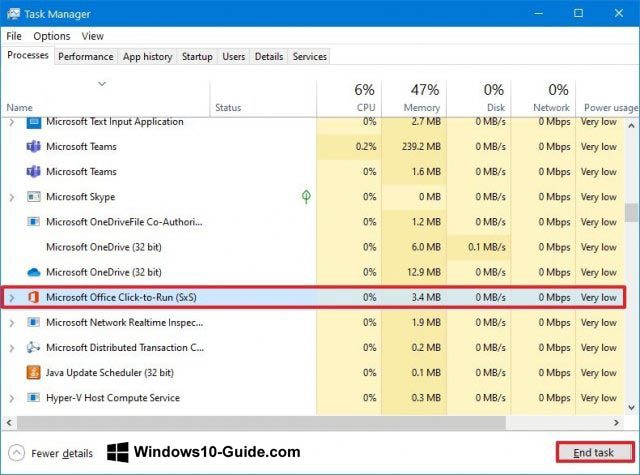
- Do this for all applications and services that interfere with installation.
After following this manual, launch the update installation again.
As an alternative, you can also perform a clean installation of Windows 10 or temporarily uninstall the interfering programs.
To uninstall the programs:
- Open the Settings app.
- Go to the Apps section.
- In the “Apps and features” section, select the interfering application.
- Click on the “Uninstall” button.
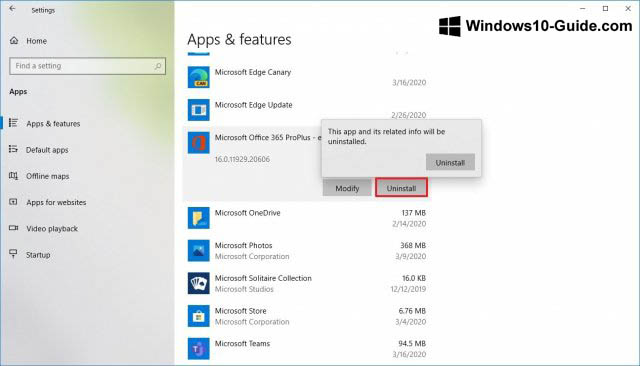
- Follow the instructions appearing on your screen.
After this, errors 0x8007042B 0x4000D and 0x800700B7 0x2000A should stop appearing and you will be able to complete the installation of the version 2004 update.
How to fix Error 0xC1900107
Error 0xC1900107 means that the device has recently been updated to a new version. However, the installation files were not deleted, and now they interfere with the next update.
As a rule, restarting the computer helps to resolve this issue. However, if the error continues to appear, use the “Storage Sense” option.
- Open the “Settings” app.
- Go to the “System” section.
- Go to the “Storage” subsection.
- Click “Configure Storage Sense or run it now”.
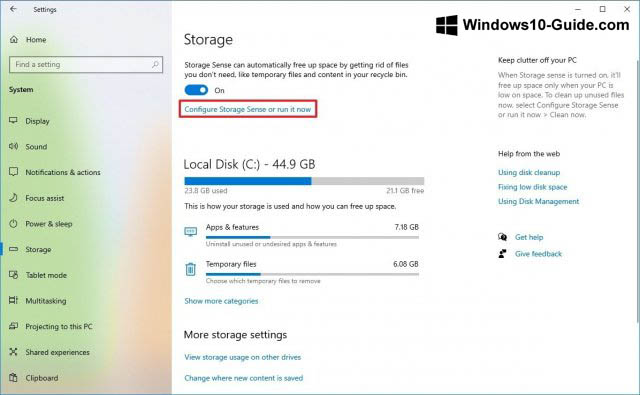
- In the section “Free up space now”, check the box for “Delete previous versions of Windows”.
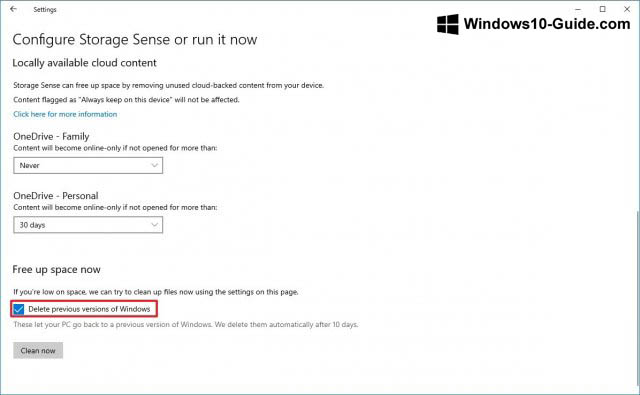
- Click on the “Clear now” button.
After these actions, the previous installation files will be deleted and Error 0xC1900107 will no longer appear.
How to fix problems during the completion of the Windows installation
Whether you are trying to install a major Windows 10 update or cumulative updates, the following two errors may appear:
Error: We couldn’t complete the updates. Undoing changes. Don’t turn off your computer.
Error: Failure configuring Windows Updates. Reverting changes.
Before looking for a solution, you need to determine the code of the error. To this end, you need to follow this manual:
- Launch the Settings application.
- Go to the “Update and Security” section.
- Open the “Windows Update” subsection.
- Click “View update history”.
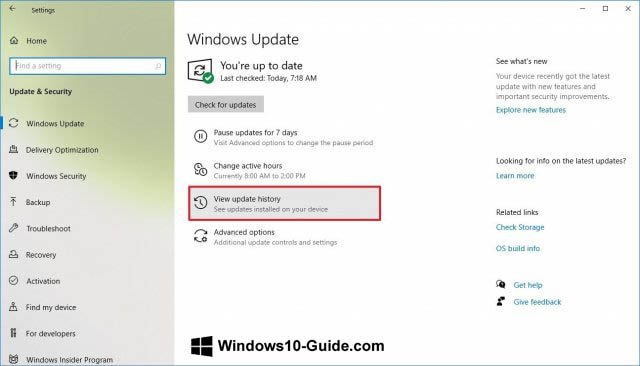
- Look at the error code that is indicated next to the update that failed to install.
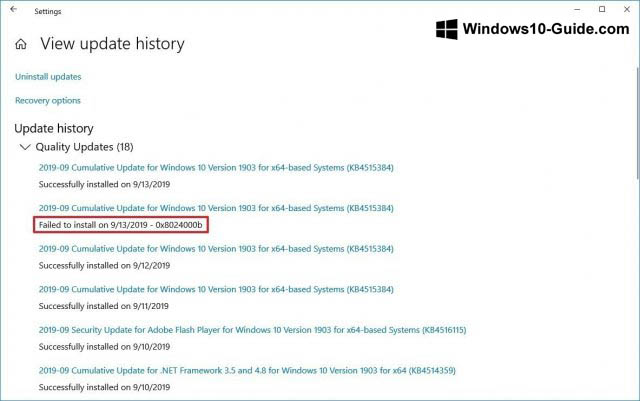
After that, use this error code to look for a solution on the Internet. You can also check the Windows 10 update log page https://support.microsoft.com/en-us/help/4498140/windows-10-update-history. On this page, you can see what problems the update has, as well as troubleshooting suggestions.
Brief guide to fixing Windows installation issues
If you get the message “Error: The update doesn’t apply to your computer”, this means your device does not have the updates that are necessary to install version 2004.
- Launch the “Settings” app.
- Go to the “Update and Security” section.
- The “Windows Update” subsection will unfold on your screen.
- Click on “Check for updates”.
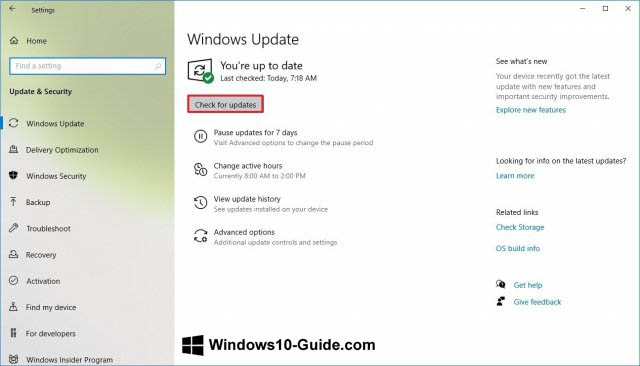
After obtaining the necessary updates, you will be able to upgrade your system to May 2020 Update using any supported method.
Troubleshooting Error 0x80200056
Error 0x80200056 is not critical. It means an accidental reboot was performed when the update was in progress. To fix it, you simply need to restart the installation of the update.
Solutions for problems that occur when installing May 2020 Update through Update Assistant
In addition to Windows Update and Media Creation Tool, Microsoft provides one more tool called Update Assistant, which can be used to force the installation of updates. There may also be errors.
If there are problems like freezes when downloading update files, it may be related to network activity. To fix such problems, follow this step-by-step manual:
- Disconnect the device from the network. You need to plug out the cable or turn off the Wi-Fi. After that, wait a minute and re-establish the connection to the network, then restart Update Assistant.
- Reboot the device and restart Update Assistant.
- Re-download Update Assistant.
- If the problems persist, use Media Creation Tool to update.
How to fix storage problems when installing May 2020 Update
Although Windows 10 has the Reserved Storage function for storing temporary files, you may still encounter errors related to disk space:
- 0x80070070 – 0x50011
- 0x80070070 – 0x50012
- 0x80070070 – 0x60000
On a 32-bit version of Windows 10, you need 16 GB of disk space to install updates. A 64-bit version requires 20 GB. If there is not enough space, you won’t be able to install the update.
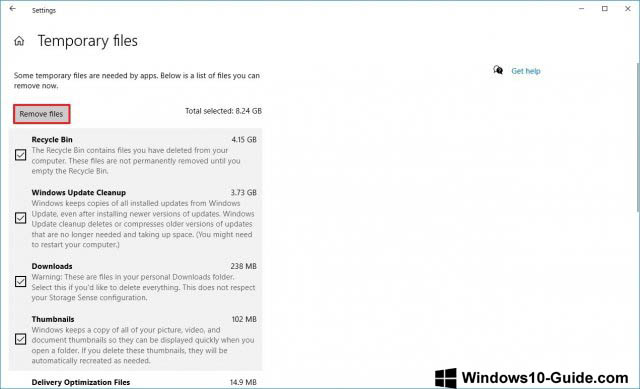
- Open the Settings app.
- Go to the “System” section.
- Open the “Storage” subsection.
- Under the description of the system partition, click on “Temporary files”.
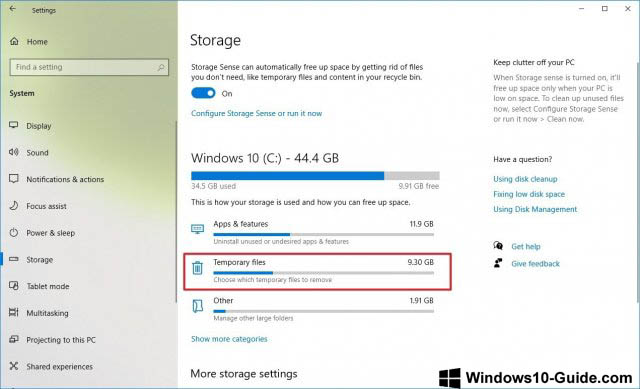
- Select objects to delete.
Hint: Do not select “Temporary Windows installation files” or “Windows ESD installation files”. These files are needed for updating.
- Click on the button “Remove files”.
After these steps, version 2004 should install without a hitch. If there is still not enough free space, you can use external storage, such as a hard disk or flash drive with no less than 16 GB. You can put the temporary installation files there.
Guide to fixing hardware and software incompatibility issues when installing May 2020 Update
Hardware and software incompatibilities can block the update process. In this case, you must find the source of incompatibility and eliminate it.
Error 0x80070002 0x20009
If you’re updating from an older version of Windows 10 to May 2020 Update, you may encounter error 0x80070002 0x20009. This means that certain files were not found.
This is another common problem with updating to the new version of Windows 10. You can solve it by disconnecting auxiliary disks, including flash drives. After disconnecting the peripherals, restart the installation process.
Error 0xC1900101
When trying to install version 2004 or another update, you may encounter errors 0xC1900101 and 0x80090011. They indicate a driver problem. The error codes are as follows:
- 0xC1900101 – 0x2000c
- 0xC1900101 – 0x20017
- 0xC1900101 – 0x30017
- 0xC1900101 – 0x30018
- 0xC1900101 – 0x3000D
- 0xC1900101 – 0x4000D
- 0xC1900101 – 0x40017
Disconnect peripherals
To minimize possible errors, it is necessary to disconnect all peripheral devices, such as external hard drives, printers, Bluetooth and USB devices, cameras, and others.
After installation, you can reconnect them to your computer.
Updating drivers
Updating the drivers of your devices to the latest versions can fix the errors. To check for driver updates on Windows 10, do the following:
Important note: if you acquire updates on the website of the device manufacturer, skip the steps below.
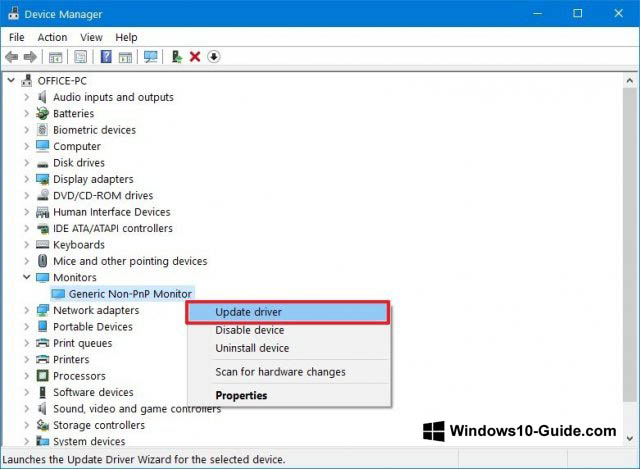
- Click the Start button.
- Enter “device manager” and run it.
- Expand the problematic device, which is usually marked with a yellow exclamation mark.
- Right-click on the device and select “Update driver”.
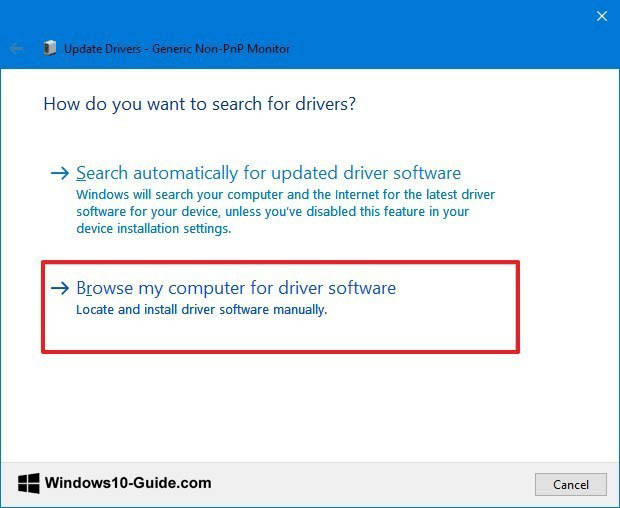
- If you have already downloaded the driver to your computer, select the option “Browse my computer for driver software”. Or you can click “Search automatically for updated driver software.”
- Click the Browse button.
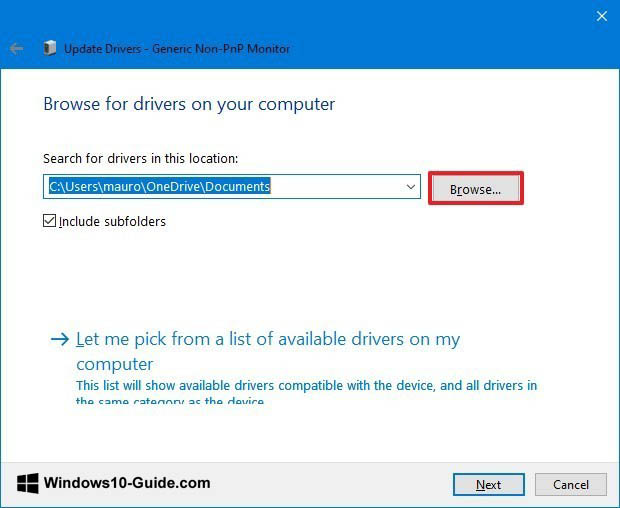
- Specify the location with the unpacked driver files.
- Click “Next”.
- Follow the instructions you see on your screen.
After you update the drivers, the errors 0xC1900101 and 0x80090011 should no longer appear.
Storage optimization
If you encounter Error 0xC1900101, you can resort to the storage settings, delete unnecessary applications and games, transfer some files to another partition or another storage to free up disk space.
Installation repair
Error 0xC1900101 may indicate problems with the current installation of Windows that prevent you from updating the system.
This error can be fixed using the command line utilities Deployment Servicing and Management (DISM) and System File Checker (SFC).
Clean installation
If the error persists, use Media Creation Tool to perform a clean installation of Windows 10.
Guide to troubleshooting hardware errors 0xC1900200, 0xC1900202, 0x80300024
If Windows 10 is already installed on your computer, you are not likely to see these errors. But if errors 0xC1900200 – 0x20008, 0xC1900202 – 0x20008 or 0x80300024 appear, it means your device does not meet the minimum system requirements.
These requirements are as follows:
| Processor | 1 GHz |
| RAM | 2 GB for 32-bit and 64-bit |
| Storage | 16 GB of disk space for the 32-bit version and 20 GB for the 64-bit version |
| GPU | DirectX 9 or later with WDDM 1.0 |
| Display | 800 x 600 |
If you get one of these errors, you most likely need to upgrade the RAM.
Error 0x800F0923
Error 0x800F0923 means compatibility problems with a driver or application on the computer. When upgrading to a new version of Windows 10, this error usually indicates a problem with the video card driver, an outdated program, or an antivirus.
One of the ways to find the problem is to run Update Assistant or Media Creation Tool. During installation, if there are compatibility issues, these tools show the error in more detail.
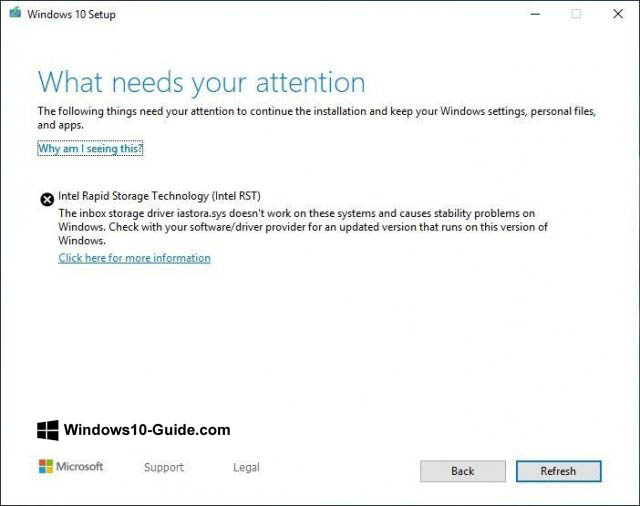
If the problem is related to a driver, you need to install its latest version from the website of the device manufacturer. Download the beta version of the driver, if one is available. In the early days of a new Windows 10 version, manufacturers test their new drivers for compatibility with the updated software.
Uninstalling incompatible drivers
You can try completely deleting the drivers, installing the update, and then reinstalling the device, if possible.
To remove the problematic driver, follow this manual:
- Click on the “Start” button.
- Enter “device manager” into the search box and open it.
- Expand the problematic application.
- Right-click on the device and select “Uninstall device”.
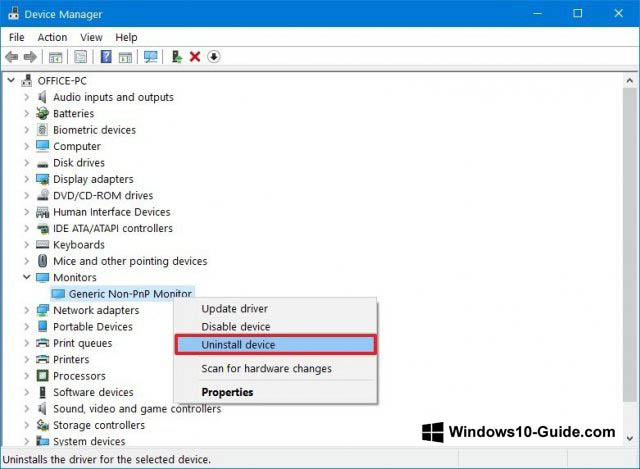
- Press the “Uninstall” button again.
After uninstalling the driver, try completing the installation of May 2020 Update.
You may also encounter errors 0x80070490 – 0x20007, which indicate a driver incompatibility, and 0x80070003 – 0x20007, which stands for failure to install the update during driver installation.
If you see one of these errors, disconnect the problematic device, and try updating again.
Error 0xC1900208
While updating to version 2004, you may encounter error 0xC1900208 – 0x4000C. This may mean an application installed on the computer is incompatible. Typically, it is an old desktop program or a third-party antivirus.
To remove incompatible applications, follow this manual:
- Open the Settings app.
- Go to the “Apps” section.
- The subsection “Apps and features” will open up on your screen.
- Select the incompatible application.
- Click on the “Uninstall” button.
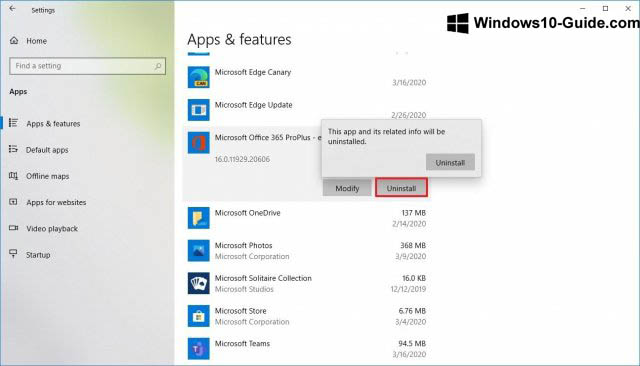
- Click on the “Uninstall” button again.
- Follow the instructions that appear on your screen.
Repeat these steps to remove all conflicting applications.
Guide to fixing errors after installing May 2020 Update
Even if the installation of Windows 10 2004 has been completed successfully, problems still may arise later on. You may encounter a black screen, as well as connectivity and activation issues.
Fixing the black screen issue after updating
It is quite common to encounter the black screen issue during and after the update installation. This usually indicates a problem with the graphics driver or hardware components or incorrect installation of the new version.
The easiest way is to fix this issue is to remove May 2020 Update from the computer using the advanced startup options:
- Turn on the computer.
- When the Windows logo appears on the screen, press the power button.
- Repeat the first two steps two more times.
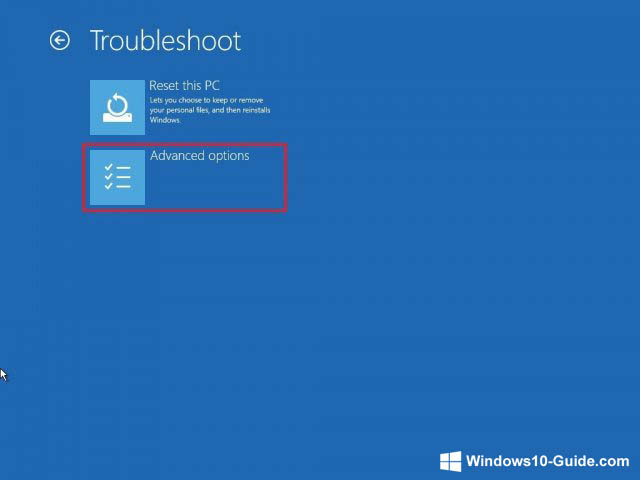
- Click on the “Advanced options” button.
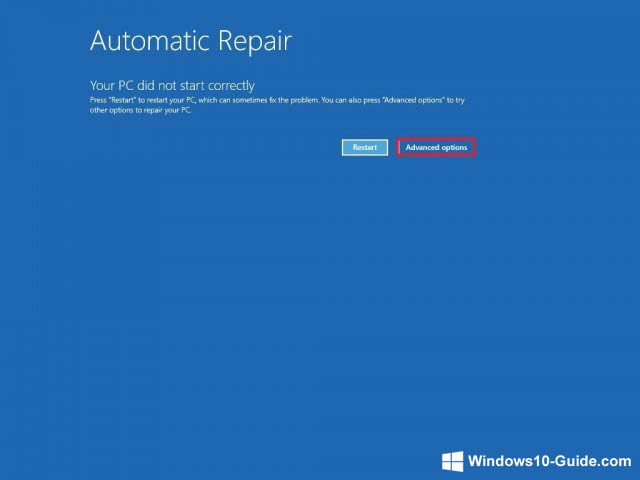
- In the advanced startup settings window, select “Troubleshoot”.
- Click “Advanced options.”
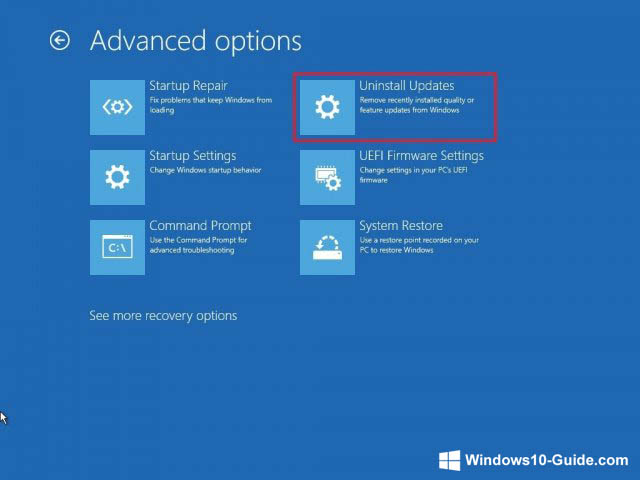
- Select “Uninstall Updates”.
- Click “Uninstall latest feature update”.
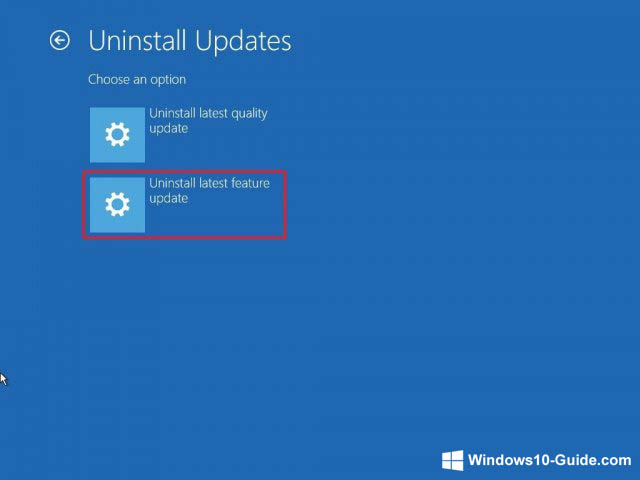
- Log in to your Windows 10 account.
- Click “Uninstall update”.
After you perform these steps, Windows 10 2004 will be uninstalled. Your computer will revert to the previous version, and the black screen issue will be solved. It is recommended that you do not re-install the update until a patch is released.
Guide to fixing network problems after updating
After installing Windows 10 May 2020 Update, there is a chance that you will encounter network problems, such as a slow wireless connection, disconnects, inability to connect to the network, or an inaccessible network adapter.
To fix network adapter problems, follow this manual:
- Open the Settings app.
- Go to the “Network and Internet” section.
- The “Status” subsection will open up in the window.
- Under the heading “Advanced network settings”, click on “Network troubleshooter.”
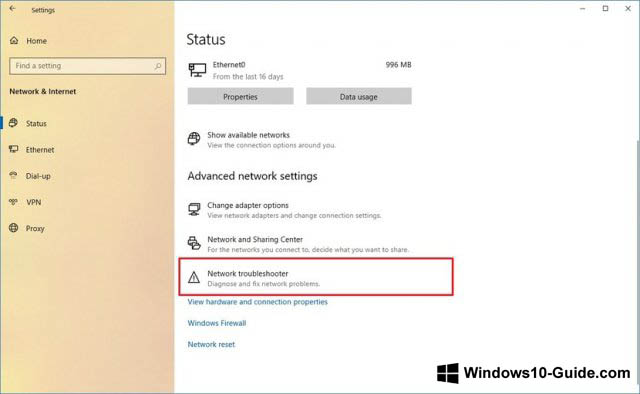
- Follow the instructions displayed on your screen.
After you perform these steps, the above-described network problems should be eliminated.
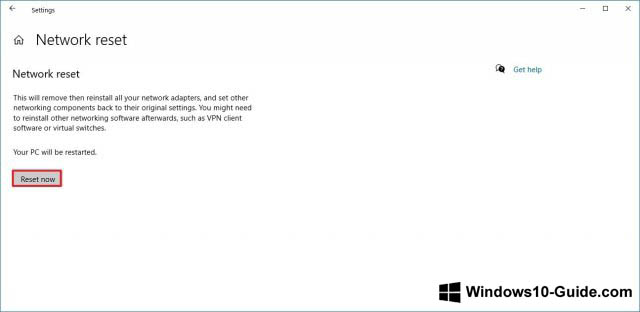
Resetting network adapters
If the problem persists, you can try resetting the network stack, which will remove, reinstall, and set the settings to default, solving the problem.
To reset Wi-Fi and wired adapters after updating to version 2004, do the following:
- Open the Settings app.
- Go to the “Network and Internet” section.
- The “Status” subsection will unfold in the window.
- Under the heading “Advanced network settings”, click on the link “Network reset”.

- Click “Reset now”.
- Click on the “Yes” button.
After completing these steps, Windows 10 will remove and reinstall all network adapters. The settings will be reset to factory defaults, which may solve the connection problems.
If the network problems persist, there can be many causes, including problems with the adapter, drivers, settings, signal, cable, router, provider, and Windows 10 2004 itself.
Solving activation issues after updating
On Windows 10, when you have already activated the system, re-activation occurs automatically after updating or even a clean installation. The user is not required to enter the license key again. But sometimes the re-activation fails to work and you get the message “Windows is not activated” with Error 0x803F7001 on the activation settings page.
In this case, you just need to wait. Later, Windows 10 should activate automatically. If several days have passed and activation still hasn’t taken place, you can use the activation troubleshooter.
Guide to minimizing problems when updating to Windows 10 May 2020 Update
Windows 10 is installed on thousands of hardware and software configurations. The development of such a system is a very complex process, so there is always a chance to encounter problems during or after updating.
But if you properly prepare before installing the update, the probability of encountering problems can be minimized.
Backup
Backing up your computer is one of the best ways to prepare for the update. The Windows 10 installation process features all the security mechanisms that allow for restoring a previous installation in case of problems. But this mechanism does not always work as intended.
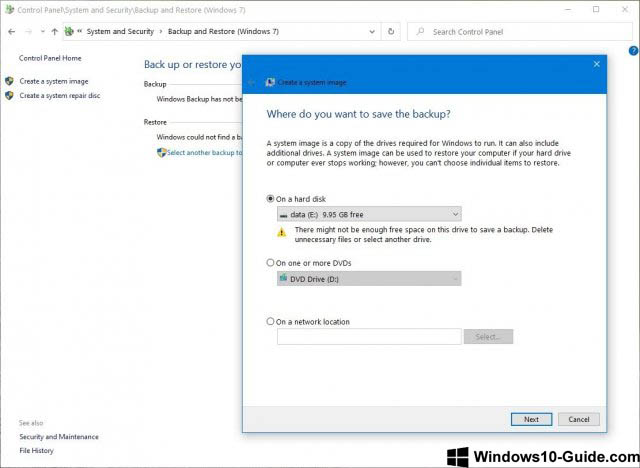
Before clicking on the “Install” button, create a temporary backup. To this end, you can use third-party applications or the tool for creating system images in Windows 10.
In addition to backing up the operating system, it is recommended that you copy your files to an external hard drive or cloud storage.
Deleting unnecessary applications
Desktop applications and third-party antivirus programs are often the reason for the inability to install an operating system update. It is recommended that you delete these applications before installing the update. Once the updating process is complete, you can reinstall them.
The process of uninstalling applications on a Windows 10 computer has already been described above.
Disabling security applications
In addition to uninstalling conflicting applications, you can remove third-party antivirus and other security applications. After updating Windows 10, you can reinstall them on your computer.
Windows Defender cannot be removed, but if the problem is caused by this component, but you can disable it.
Important: temporarily uninstalling and disabling security applications is not dangerous. However, you should never leave your device unprotected for a long time.
To temporarily disable Windows Defender, perform the following steps:
- Open the Settings app.
- Go to the “Update and Security” section.
- Open the “Windows Security” subsection.
- Click on “Virus and threat protection”.
- In this section, click on “Virus and threat protection settings”.
- Flip the switch “Real-time protection: into the “Off” position
After you perform these steps, the antivirus should no longer conflict with the update process. And once the installation is completed, Windows Defender will turn on automatically.
Freeing up disk space
If the amount of free disk space on your device is small, the update will not install. You need to free up disk space before proceeding with the update.
Removing unnecessary peripherals
Unnecessary peripheral devices often become the source of problems during an update. Before installing May 2020 Update, it’s better to disconnect all flash drives, memory cards, external hard drives, printers, scanners, Bluetooth devices, etc. from the computer. Disconnect the docking station from the laptop.
All that should remain is a mouse, keyboard, monitor, and internet connection. After installing the update, all peripheral devices can be reconnected.
Disabling the firewall
The firewall can cause problems if you have changed its default settings or use an application that is incompatible with Windows 10.
To disable a third-party firewall, read the developer’s instructions. If the problem is caused by the built-in Windows firewall, follow this manual to disable it:
- Open the Settings app.
- Go to the “Update and Security” section.
- Open the “Windows Security” subsection.
- Click on “Firewall and network protection”.
- Click on the active network.
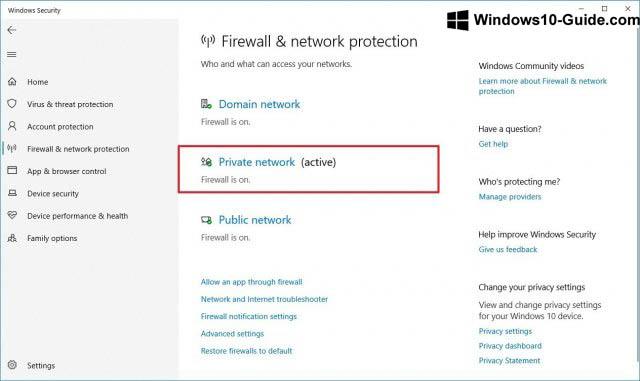
- Turn off Windows Defender Firewall.
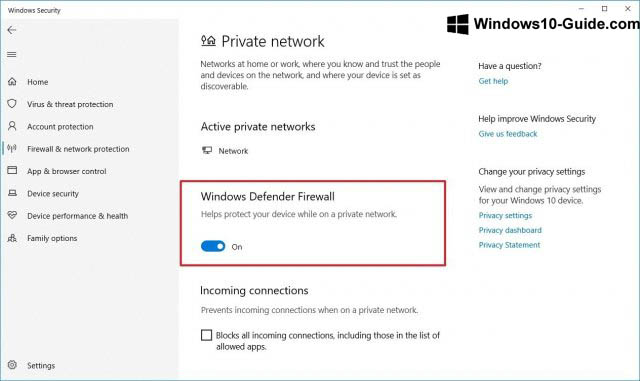
After you disable the firewall, there should be no more problems with the installation of Windows 10 2004.
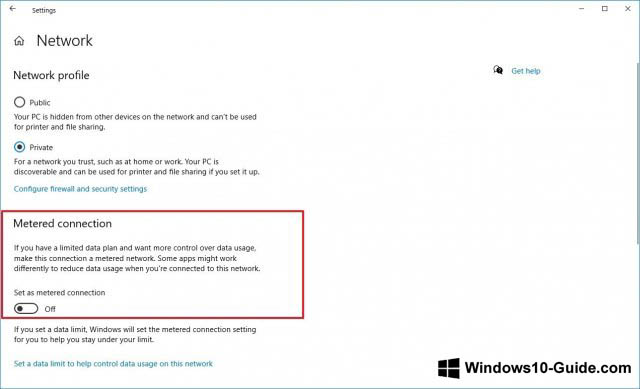
Disabling metered connections
If you configured your network connection as metered, Windows 10 2004 will not download. The update needs Internet access with unlimited traffic.
To disable the metered connection, you need to do the following:
- Open the Settings app.
- Go to the “Network and Internet” section.
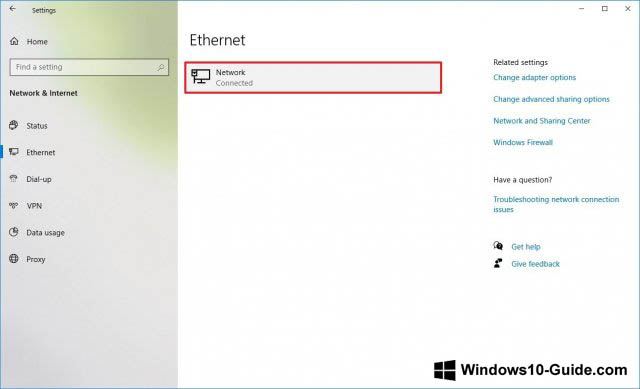
- Click on Wi-Fi or Ethernet.
- Select the active network connection.
- In the “Metered connection” section, turn off the switch “Set as metered connection”.
You can also create bootable USB media using another computer with a connection with unlimited traffic and then use the USB drive to update without access to the Internet.
Clean installation
If you want to minimize the probability of problems, the easiest way is to perform a clean installation of Windows 10. A clean installation will delete all the data on the current partition of the hard drive, allowing you to install the system without any bugs or issues.
If you want to perform a clean installation, you need to create a bootable USB flash drive using Media Creation Tool.
Concluding words
Microsoft is trying to maximize the system’s performance and simplify the process of transitioning to the next version of Windows 10. But its high complexity makes it nearly impossible to envisage all errors.
It is not recommended to install such major updates on your computer immediately after their release. They may contain unknown bugs and errors, causing problems on your device. It is preferable to wait until several cumulative updates have been released to make the system more stable.